This recipe started as a happy accident in my kitchen, where I toasted coconut until it was deeply golden and smoky, then wondered how it would taste paired with rich, bittersweet chocolate. The contrast between the crunchy, caramelized coconut and the silky, slightly bitter chocolate is more than just a flavor combo—it’s a texture adventure that keeps me reaching for seconds. I love how this simple bar feels like a little treasure, a bite of nostalgia with a grown-up twist.
What makes these chocolate coconut bars special isn’t just the ingredients, but the way the coconut’s toasted aroma fills the air as they bake, pulling you into the moment. They’re perfect for a quick treat, but also a bit fancy if you cut them into smaller squares for a gathering. Every time I make these, I’m reminded that sometimes the best pairings come from a little kitchen curiosity and a lot of honest, messy effort.
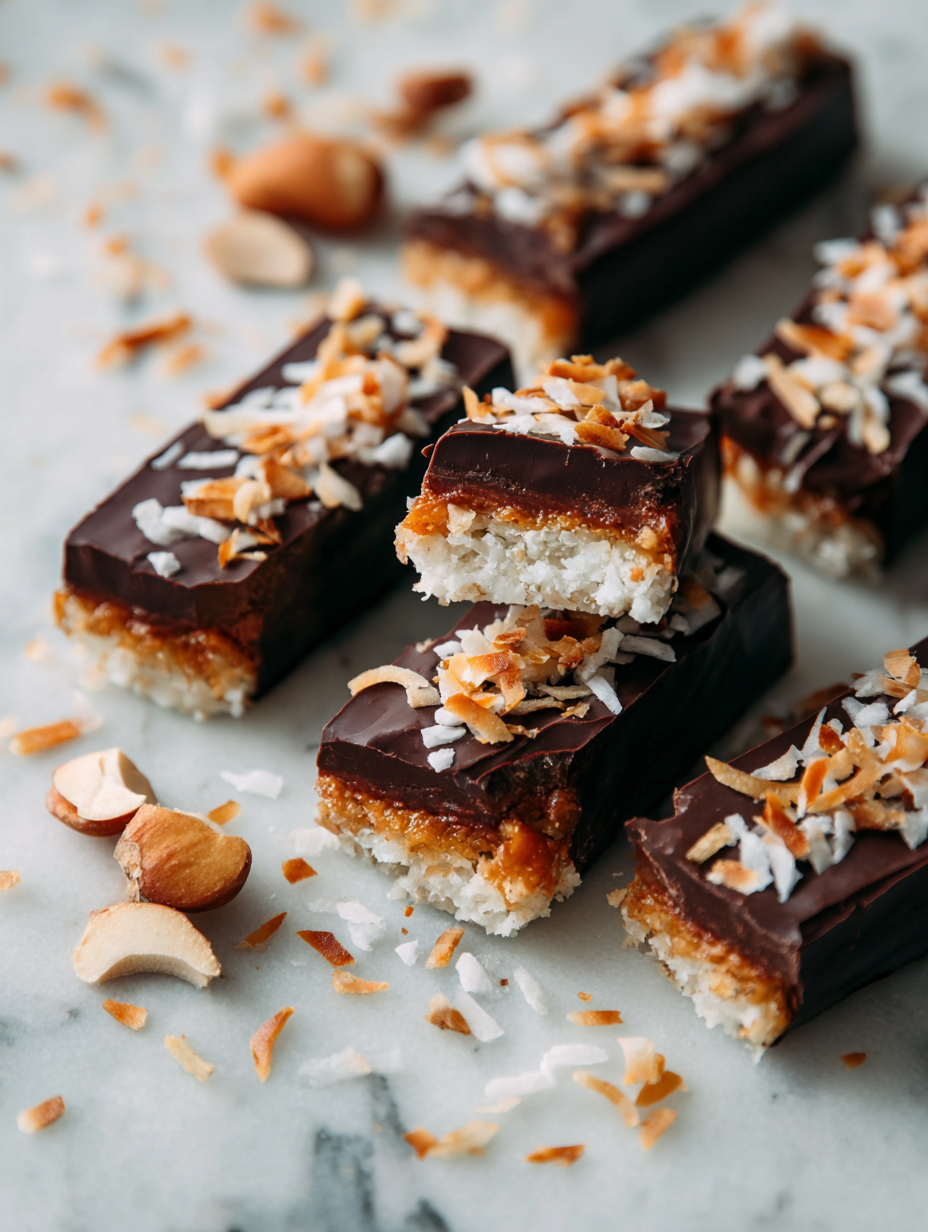
Focusing on the unexpected pairing of toasted coconut with rich, dark chocolate to create a bar that balances smoky sweetness with creamy decadence.
The story behind this recipe
- This recipe came about one rainy afternoon when I was digging through my pantry, looking for something to satisfy that coconut and chocolate craving without turning on the oven. I remembered how my grandma used to toast shredded coconut in her cast-iron skillet, filling the kitchen with a nutty, smoky aroma that made everything feel a little more special. That moment of nostalgia, mixed with a desire for a quick, satisfying treat, led me to combine toasted coconut with dark chocolate for a bar that’s both simple and layered.
- Every batch feels like a small victory—getting that perfect toasty edge on the coconut or the glossy sheen of melted chocolate just right. I love how these bars remind me that comfort food can be playful and a little bit refined at the same time. They’re my go-to when I want a sweet fix that’s honest, unpretentious, and full of flavor—no fancy ingredients needed, just a little kitchen curiosity and a lot of love.
- heading: The story behind this recipe
Ingredient breakdown: key components
- Coconut: I prefer shredded, unsweetened coconut for that pure, toasty flavor—look for flakes that crackle and turn golden in the oven, then add a smoky aroma to your kitchen. If you want more chew, try chopped dried coconut instead.
- Dark Chocolate: I use 70% or higher cocoa content for a bittersweet punch—melts smoothly and leaves a glossy finish. If you prefer milder, swap in semi-sweet, but don’t skip the quality, or it’ll taste flat against the coconut’s richness.
- Butter: I go for salted butter to balance the sweetness—melts into the chocolate with a creamy scent that’s hard to resist. For a dairy-free version, coconut oil works, but you’ll miss that familiar richness and a slight coconut aroma.
- Sweetener: I stick with honey or golden syrup for a subtle floral note—adds moisture and helps everything stick together. Maple syrup can work, but it adds a distinct flavor that changes the profile, so use it sparingly.
- Optional Add-ins: I love tossing in flaky sea salt or a pinch of chili powder—creates a contrast, a little surprise on each bite. Keep it simple, or go wild with chopped nuts or dried fruit for extra texture and flavor.
Spotlight on key ingredients
Chocolate:
- Coconut: I prefer shredded, unsweetened coconut for that pure, toasty flavor—look for flakes that crackle and turn golden in the oven, then add a smoky aroma to your kitchen. If you want more chew, try chopped dried coconut instead.
- Dark Chocolate: I use 70% or higher cocoa content for a bittersweet punch—melts smoothly and leaves a glossy finish. If you prefer milder, swap in semi-sweet, but don’t skip the quality, or it’ll taste flat against the coconut’s richness.
Coconut:
- I prefer shredded, unsweetened coconut for that pure, toasty flavor—look for flakes that crackle and turn golden in the oven, then add a smoky aroma to your kitchen. If you want more chew, try chopped dried coconut instead.
- Dark Chocolate: I use 70% or higher cocoa content for a bittersweet punch—melts smoothly and leaves a glossy finish. If you prefer milder, swap in semi-sweet, but don’t skip the quality, or it’ll taste flat against the coconut’s richness.
Notes for ingredient swaps
- Dairy-Free: Coconut oil can replace butter for a similar richness, but it might add a slight coconut aroma. Use refined coconut oil to avoid extra flavor.
- Sweetener: Maple syrup or agave nectar can substitute honey or golden syrup, though they add a distinct flavor and slightly different sweetness profile.
- Chocolate: Unsweetened cocoa solids mixed with a bit of coconut oil can stand in for melted chocolate—use this for a less sweet, more intense cocoa flavor.
- Coconut: Shredded unsweetened coconut can be swapped with dried, chopped dried coconut or even toasted coconut flakes for varied texture and smoky aroma.
- Add-ins: Chopped nuts, dried fruit, or sea salt flakes can be swapped or omitted entirely—these add crunch and contrast but aren’t essential.
- Binding agent: If you want a firmer bar, a small amount of honey or golden syrup can help, or try adding a touch of rice syrup for a neutral sweetness.
- Flavor twists: For a spicy kick, sprinkle chili powder or cinnamon into the chocolate mixture—just a pinch for a warm depth.
Equipment & Tools
- Baking pan (9×9 inch): Holds the mixture for easy removal and slicing.
- Medium saucepan: Melts the chocolate gently without burning.
- Spatula: Stirs and spreads the mixture evenly.
- Parchment paper: Prevents sticking and makes lifting out easier.
- Sharp knife: Cuts clean slices for neat bars.
Step-by-step guide to chocolate coconut bars
- Equipment & Tools: Line a 9×9 inch (23×23 cm) baking pan with parchment paper—easy to lift out later. Have a medium saucepan ready for melting chocolate, and a spatula for mixing.
- Toast coconut: Spread shredded coconut evenly in a dry skillet over medium heat (around 160°C/320°F). Stir constantly, watching for deep golden and smoky edges, about 5-7 minutes. Remove and set aside to cool.
- Melt chocolate: In the saucepan over low heat (about 50°C/122°F), melt chopped dark chocolate, stirring gently until smooth. Turn off heat once melted—don’t overheat or it’ll seize.
- Combine ingredients: Mix toasted coconut into the melted chocolate. Add a pinch of salt or chili if you like a little kick. Stir until evenly coated and glossy.
- Transfer to pan: Pour the mixture into your prepared pan. Use a spatula to press it evenly into the corners and smooth the top. Lightly tap the pan on the counter to settle the mixture.
- Chill: Place in the fridge for at least 2 hours, or until firm. For a quicker set, freeze for about 1 hour. The bars should feel firm but not brittle.
- Cut and serve: Lift the whole block out of the pan using parchment edges. Slice into squares or rectangles—about 1-inch (2.5 cm)—and serve. Keep leftovers refrigerated.
- Finishing tip: For a shiny finish, lightly warm a knife and smooth over the tops after cutting. Store in an airtight container in the fridge for up to a week.
Refrigerate the bars until firm, at least 2 hours. For best shine, warm a knife slightly before slicing. Serve directly from the fridge for crisp edges, or let sit at room temperature for softer bites. Store leftovers in an airtight container in the fridge for up to a week.
How to Know It’s Done
- Coconut is deeply golden and fragrant—smoky and nutty aroma fills the air.
- Chocolate is fully melted, glossy, and smooth—no lumps or graininess.
- Bars are firm to the touch and hold shape when cut—no sticky or soft edges.
Toasted Coconut Chocolate Bars
Ingredients
Equipment
Method
- Line your baking pan with parchment paper, smoothing it out to prevent sticking.
- Spread the shredded coconut evenly in a dry skillet over medium heat, listening for a gentle sizzle.
- Stir constantly as the coconut begins to turn golden and emits a nutty, smoky aroma, about 5-7 minutes.
- Remove the coconut from the skillet and set aside to cool slightly.
- In a medium saucepan, melt the chopped dark chocolate over low heat, stirring gently until smooth and glossy.
- Add the butter and honey to the melted chocolate, stirring until fully combined and shiny.
- Fold the toasted coconut into the melted chocolate mixture, ensuring all the coconut is evenly coated.
- Pour the mixture into the prepared pan, spreading it evenly with a spatula and pressing down gently.
- Sprinkle a pinch of sea salt on top if desired, then refrigerate for at least 2 hours until set.
- Once firm, lift out the block using the parchment edges and place on a cutting board.
- Using a sharp knife warmed slightly, cut into squares or rectangles of your preferred size.
- Serve immediately or store in an airtight container in the fridge for up to a week for best freshness and shine.
Notes
Pro tips for perfect bars
- Bolded mini-head: Keep coconut shredded and evenly spread in the skillet to prevent burning and ensure even toasting.
- Bolded mini-head: Stir constantly while toasting coconut; it’s ready when it turns deep golden and smells nutty, about 5-7 minutes.
- Bolded mini-head: Melt chocolate gently over low heat; avoid high temperatures to prevent seizing, and stir until smooth and glossy.
- Bolded mini-head: Press the mixture firmly into the pan for an even layer; use the back of a spatula or a small flat object to smooth.
- Bolded mini-head: Chill the bars until firm, at least 2 hours in the fridge; for quicker setting, freeze for about an hour.
- Bolded mini-head: For shiny tops, warm your knife slightly before slicing to get clean, smooth edges and a professional look.
Common mistakes and how to fix them
- FORGOT to preheat oven → Always preheat to ensure even toasting.
- DUMPED chocolate too quickly → Melt chocolate slowly over low heat to prevent seizing.
- OVER-TORCHED coconut → Stir constantly and remove once coconut is golden to avoid burnt flavor.
- SKIPPED resting time → Chill bars at least 2 hours for proper setting and clean slicing.
Quick fixes and pantry swaps
- When coconut burns easily, splash a little water in the skillet to cool it down quickly.
- If chocolate seizes during melting, patch it by stirring in a teaspoon of vegetable oil until smooth.
- Dumped coconut too early? Restir and continue toasting over low heat until golden and fragrant.
- Over-torched coconut? Shield it with a sprinkle of sugar or a dash of milk, then resume stirring gently.
- If bars aren’t setting, quick rescue by placing them in the fridge for 15 minutes to firm up.
Prep, store, and reheat tips
- Prepare the mixture and toast the coconut ahead of time; store in an airtight container at room temperature for up to 24 hours to keep the coconut crisp and fragrant.
- Bars can be stored in the fridge for up to a week; wrap tightly to prevent moisture absorption, which can soften or dull the chocolate’s shine.
- For longer storage, freeze the bars in an airtight container for up to 3 months. Thaw in the fridge for best texture and flavor.
- Reheat slices briefly in a warm oven (around 150°C/300°F) for 5 minutes to soften, or enjoy chilled for a firmer bite. The aroma of coconut and chocolate becomes more intense when slightly warmed.
Top questions about chocolate coconut bars
1. Can I use sweetened coconut?
Use shredded, unsweetened coconut for the best flavor and texture. It turns golden and smoky when toasted, adding depth to the bars.
2. Can I substitute honey for syrup?
Yes, but it will be sweeter and might alter the texture slightly. Reduce added sweeteners accordingly.
3. What if I don’t have dark chocolate?
Absolutely, but honey can add moisture and a slightly floral note, so consider reducing other liquids slightly.
4. How do I know when the coconut is toasted enough?
Milk or semi-sweet chocolate works, but the bars will be less intense and richer in sweetness.
5. Can I skip the toasting step?
It should be deeply golden and fragrant, with a nutty, smoky aroma filling your kitchen.
6. How long do I need to chill the bars?
Skipping will give you a milder coconut flavor and softer texture, but you’ll lose that smoky crunch.
7. Can I freeze these bars?
At least 2 hours in the fridge, or until the mixture is firm and easy to cut cleanly.
8. What’s a quick fix if the chocolate seizes?
Yes, freeze for up to 3 months. Wrap tightly and thaw in the fridge before serving.
9. How do I get shiny, smooth tops?
Stir in a teaspoon of vegetable oil or warm it gently over low heat to smooth it out.
10. Can I add other ingredients like nuts or dried fruit?
Warm a knife slightly before slicing to get clean, professional-looking edges.
These chocolate coconut bars feel like a little rebellion—crunchy, smoky, and just a touch indulgent. They’re honest treats, perfect when you want something quick that still carries a bit of kitchen story in every bite.
Whenever I make them, I’m reminded that simple ingredients and a bit of patience can turn into something surprisingly memorable. No matter the occasion, these bars always seem to find a way into my hand, offering a quiet moment of satisfaction and a little burst of joy.

Hi, I’m Oliver Stone, the writer, cook, and storyteller behind Crying Into the Onions. I’m so glad you found your way here. This blog was born from equal parts humor, heart, and a deep love for honest cooking. I started this blog to share more than just recipes — I wanted to capture the emotions, memories, and quirks that make food more than fuel. Because sometimes, cooking makes you laugh. Sometimes, it makes you cry (into the onions, naturally). And most of all, it brings people together.

