Growing up, street food stalls served these smoky, spice-laden vegetable tikkis that I’d chase after with sticky fingers and a hungry grin. Making them at home feels like a small act of reclaiming those chaotic, flavorful moments, but with ingredients from my own pantry. It’s a messy, honest process that pulls me back to those bustling markets and the joy of simple, soulful bites.
This recipe isn’t about perfection — it’s about capturing that nostalgic feel, the kind that makes you crave a spicy, crispy edge and the softness inside. I love how versatile it is, perfect for a quick snack or a casual party platter, especially when I want to pack some vegetables into an otherwise indulgent moment. It’s a reminder that comfort foods can be fresh, veggie-packed, and full of personality, even on busy weeknights.
Focusing on the nostalgic comfort of childhood street food, this vegetable tikki recipe is a homemade revival of those smoky, spice-kissed bites I used to chase after in busy markets. It’s about capturing that messy, flavorful joy with ingredients you already have, giving a fresh, veggie-packed twist to a beloved classic.
Reviving Street Food Memories
- Making these tikki brings me straight back to childhood afternoons at busy street corners, chasing the smoky smell.
- I feel a rush of pride when I get the spices just right—it’s like capturing a secret family recipe.
- There’s a chaos in the kitchen when I prep everything, but the first crispy bite calms all that noise.
- Cooking these reminds me how simple ingredients can turn into something lively and full of personality.
Reviving Street Food Memories
Making vegetable tikkis at home started as a way to reclaim the street food magic I grew up craving. I remember the smoky aroma and the crisp edges that made every bite a little celebration. Over time, I tweaked the spices and added more vegetables, hoping to keep that nostalgic crunch but with a healthier twist. Now, every batch feels like a small act of bringing those bustling markets into my quiet kitchen, one crispy, veggie-packed bite at a time.
Trivia and Cultural Roots
- Vegetable tikkis trace their roots to Indian street food vendors, where they were quick, flavorful snacks for busy markets.
- The crispy edges and spice blend reflect a fusion of regional flavors, adapted over generations for home kitchens.
- Traditionally, these tikkis were made with leftover vegetables, turning humble ingredients into something special.
- They became popular as a vegetarian alternative to meat cutlets, especially during fasting or special occasions.
- Today, vegetable tikkis are a canvas for creative twists—adding cheese, herbs, or unusual vegetables—keeping the street food spirit alive.
Key ingredients and their tweaks
- Potatoes: I use starchy potatoes for a fluffy interior, but if you want a firmer bite, swap in waxy ones. The smell of boiling potatoes is comforting and familiar.
- Mixed Vegetables: I prefer a mix of carrots, peas, and corn, for color and sweetness. Feel free to add finely chopped spinach for a boost of green and nutrition.
- Spices: My go-to blend includes cumin, coriander, and a pinch of chili powder. Adjust the heat depending on your spice tolerance—smell that fragrant spice mix bloom in the pan.
- Binding Agent: I rely on breadcrumbs and a little bit of chickpea flour to hold everything together. If too dry, splash in a teaspoon of water and mix well until it feels just right.
- Fresh Herbs: Cilantro and green chilies brighten up the mix. If you’re out of cilantro, mint works beautifully, adding a fresh, cool note.
- Oil for Frying: Use neutral oil like vegetable or sunflower, but a hint of sesame oil adds a nutty aroma. Watch for that crackling sound to know the tikkis are crisping up nicely.
- Lemon Juice: A squeeze at the end adds a bright, zingy contrast. If you don’t have lemon, a splash of vinegar works but keeps the flavor lively.
Spotlight on key ingredients
Vegetables:
- Potatoes: I prefer starchy ones for a fluffy interior, but waxy varieties give a firmer bite—feel free to experiment. The aroma of boiling potatoes is comforting and earthy.
- Mixed Vegetables: I love carrots, peas, and corn for their color and sweetness that contrast the spices. Finely chopped spinach adds a fresh, slightly bitter note that brightens the whole bite.
Fresh herbs and spices:
- Spices: My spice blend of cumin, coriander, and chili powder creates that warm, smoky aroma that fills the kitchen. Toasting them releases essential oils, deepening the flavor and making your space smell like street food.
- Breadcrumbs & Chickpea Flour: These act as the glue, giving the tikki structure. When mixed well, they create a slightly crispy crust when fried. If the mixture feels too loose, a sprinkle more helps.
- Fresh Herbs: Cilantro and green chilies add a burst of freshness. The cilantro’s bright, citrusy scent pairs perfectly with the smoky spices, and the chilies give just enough heat without overpowering.
Notes for ingredient swaps
- Potatoes: I prefer starchy potatoes for fluffiness, but waxy ones can give a firmer bite—just keep an eye on moisture.
- Mixed Vegetables: Carrots, peas, and corn add sweetness and color, but finely chopped spinach or zucchini can boost greens.
- Spices: Cumin, coriander, and chili powder are my go-to; swap in smoked paprika or garam masala for different depth.
- Binding Agents: Breadcrumbs and chickpea flour hold everything together—if too dry, splash with a teaspoon of water.
- Fresh Herbs: Cilantro and green chilies add brightness. If you’re out, mint or parsley work well as substitutes.
- Oil for Frying: Vegetable or sunflower oil is neutral; a touch of sesame oil brings a nutty aroma, but keep an eye on the crackle.
- Lemon Juice: Brightens up the flavor with acidity; vinegar can work in a pinch but might dull the fresh zing.
Equipment & Tools
- Grater: To grate potatoes and vegetables finely.
- Pan: To toast spices and fry the tikkis.
- Spatula: To flip and remove tikkis from oil.
- Mixing bowl: To combine all ingredients.
- Paper towels: To drain excess oil from fried tikkis.
Step-by-step guide to vegetable tikkis
- Gather your ingredients: potatoes, mixed vegetables, spices, breadcrumbs, chickpea flour, cilantro, green chilies, oil, lemon juice. Have a mixing bowl and a grater ready.
- Peel 2 large starchy potatoes. Grate them finely into a bowl. Squeeze out excess moisture gently with your hands or a clean cloth. Set aside.
- Finely chop 1 cup mixed vegetables—carrots, peas, corn. If using fresh spinach, chop finely. Mix into the grated potatoes.
- In a small pan, toast 1 teaspoon cumin and 1 teaspoon coriander seeds over medium heat (about 160°C/320°F) until fragrant, 1-2 minutes. Crush coarsely.
- Add 1 teaspoon chili powder, 1 teaspoon turmeric, and the toasted spices to the vegetable mix. Stir well to coat evenly. Let the aroma bloom, about 30 seconds.
- Sprinkle in 3 tablespoons breadcrumbs and 2 tablespoons chickpea flour. Add 2 tablespoons chopped cilantro and 1 finely chopped green chili. Mix until combined and slightly sticky.
- If the mixture feels too dry, add a teaspoon of water and knead until it binds well. If too wet, sprinkle in a little more breadcrumbs. It should hold shape without being mushy.
- Divide the mixture into 8 equal portions. Roll each into a ball, then flatten into a patty about 1.5 cm thick.
- Heat about 1.5 cm of neutral oil (vegetable or sunflower) in a large skillet over medium-high heat, around 180°C/355°F. When hot, gently slide in the tikkis.
- Cook for about 3-4 minutes per side, until golden brown and crispy. Flip carefully with a spatula. They should crackle and emit a rich aroma.
- Check the tikkis: they should be evenly browned, firm but tender inside, and smell smoky with spices. If not, adjust cooking time.
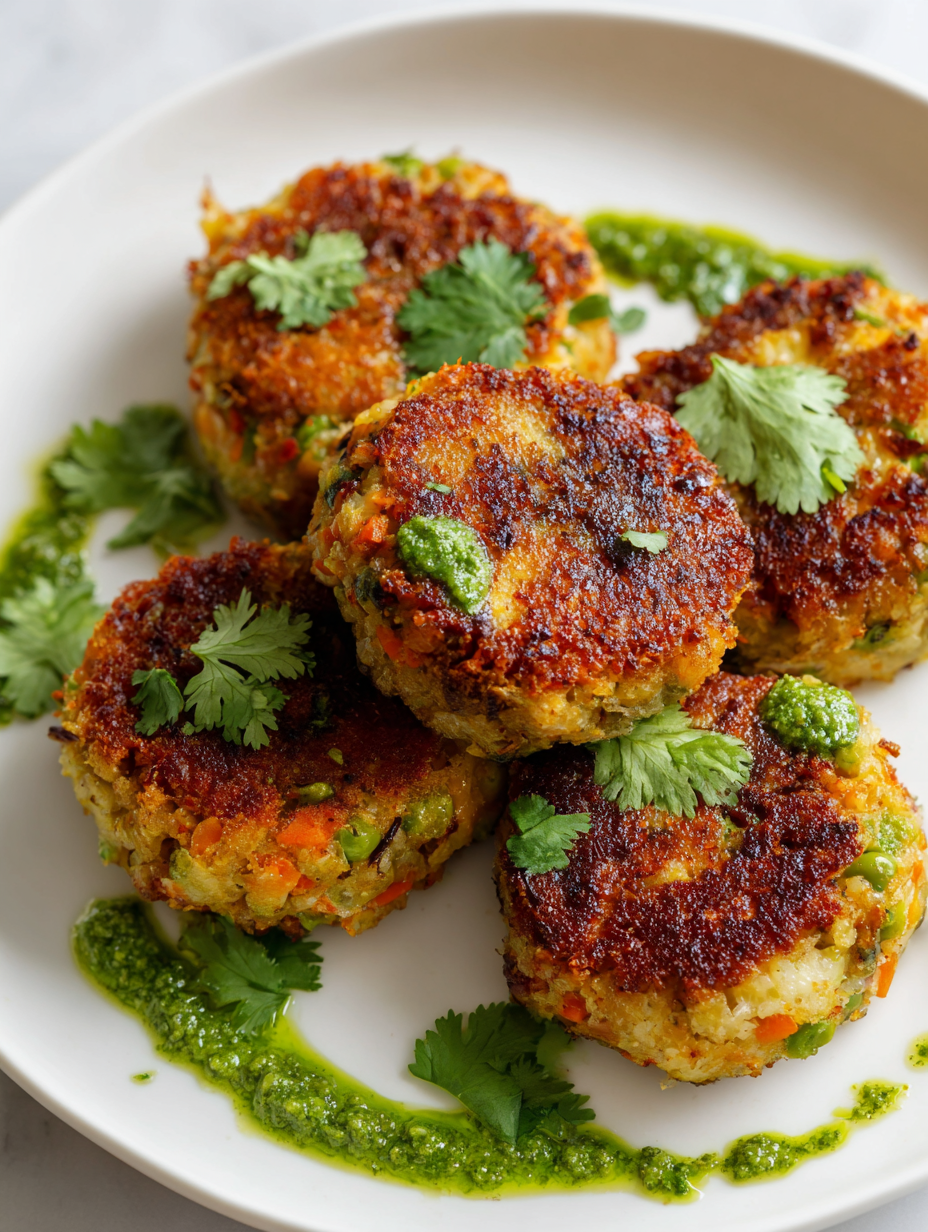
- Remove from oil and drain on paper towels. Let rest for 2 minutes. Serve with a squeeze of lemon, chutney, or yogurt.
Let the tikkis rest on paper towels for 2 minutes. Serve warm with lemon wedges, yogurt, or chutney. Plate neatly to showcase their crisp edges.
How to Know It’s Done
- Tikkis are golden and crispy on the outside.
- They hold their shape without falling apart when flipped.
- The aroma is fragrant with toasted spices and fresh herbs.
Vegetable Tikkis
Ingredients
Equipment
Method
- Peel the potatoes, then grate them finely into a large mixing bowl. Gently squeeze out excess moisture with your hands or a clean cloth to prevent sogginess.
- Finely chop the mixed vegetables—carrots, peas, and corn—and add them to the grated potatoes. Mix well to distribute the colors and textures.
- In a small pan, toast cumin and coriander seeds over medium heat until fragrant, about 1-2 minutes. Crush them coarsely using a mortar and pestle or the back of a spoon.
- Add the toasted spices, chili powder, and turmeric to the vegetable mixture. Stir until well combined, releasing a warm, fragrant aroma.
- Sprinkle in the breadcrumbs and chickpea flour, then add chopped cilantro and green chili. Mix everything thoroughly until the mixture is cohesive and slightly sticky.
- If the mixture feels too dry, add a teaspoon of water and knead gently. If it’s too wet, sprinkle in more breadcrumbs until it holds shape.
- Divide the mixture into 8 equal portions. Roll each into a ball, then flatten into a patty about 1.5 cm thick.
- Heat oil in a skillet over medium-high heat until shimmering and hot (about 180°C/355°F). Carefully slide in the tikkis, ensuring not to overcrowd the pan.
- Fry the tikkis for 3-4 minutes per side until golden brown, crispy, and fragrant. Flip gently with a spatula, listening for the satisfying crackle of frying.
- Remove the cooked tikkis with a slotted spatula and drain on paper towels. Rest for a couple of minutes to maintain crispness.
- Squeeze fresh lemon juice over the tikkis, then serve warm with chutney, yogurt, or your favorite dipping sauce. Enjoy the crispy, flavorful bites!
Tips and tricks for perfect tikkis
- Bolded mini-head: Use a thermometer → Keep oil at 180°C/355°F for crispy, evenly cooked tikkis.
- Bolded mini-head: Chill the mixture briefly → Resting in the fridge for 15 minutes helps the ingredients bind better, making shaping easier.
- Bolded mini-head: Don’t overcrowd the pan → Fry in batches to prevent temperature drops, ensuring each tikki crisps up properly.
- Bolded mini-head: Maintain steady heat → Keep oil hot but not smoking, to avoid oily or burnt edges and achieve that perfect golden crust.
- Bolded mini-head: Flip carefully → Use a slotted spatula and flip gently once edges are golden, about 3-4 minutes per side, for even crispiness.
- Bolded mini-head: Drain excess oil → Rest on paper towels immediately after frying to keep them crispy and not greasy.
- Bolded mini-head: Serve hot → Best enjoyed fresh for maximum crunch and flavor, but can be kept warm in a low oven for 10 minutes.
Common mistakes and how to fix them
- FORGOT to check oil temperature → Use a thermometer to avoid under/over-frying.
- DUMPED too much flour → Add gradually, mixture should hold but not be sticky.
- OVER-TORCHED spices → Toast over medium heat, watch for fragrant aroma, not smoke.
- MISSED resting time → Rest cooked tikkis 2-3 minutes for crispness to settle.
Quick fixes and pantry swaps
- When oil shimmers, splash in a tiny bit of water to see if it crackles—rescue with fresh oil if dull smell persists.
- Splash a little water if the mixture is too dry—knead until it just holds together, avoiding mushiness.
- Patch over over-torched spices with a pinch of sugar or a squeeze of lemon to balance bitterness.
- Shield delicate tikkis from splatters by lowering heat slightly—prevents burning and keeps crispy edges perfect.
- If you’re out of breadcrumbs, pantry swap with crushed cornflakes or oats for a crunchy texture.
Prep, store, and reheat tips
- You can prep the vegetable mixture a day ahead; store it in an airtight container in the fridge for up to 24 hours. It firms up slightly, making shaping easier later.
- Cooked tikkis can be kept in the fridge for up to 2 days. Reheat in a hot skillet for 2-3 minutes per side until crispy and warmed through, with a faint crackle of oil.
- For longer storage, freeze uncooked tikkis on a baking sheet, then transfer to a zip-top bag. They can last up to a month. Fry straight from frozen, adding an extra minute per side.
- Reheated tikkis tend to lose some crispness; serve immediately after reheating for the best texture. The aroma of spices will rekindle with a quick re-fry or oven bake.
Common Questions About Vegetable Tikkis
1. Can I use different potatoes?
Use starchy potatoes like Russets for fluffiness, but if you prefer a firmer bite, try waxy potatoes like Yukon Gold. The smell of boiling potatoes is warm and earthy.
2. Can I change the vegetables?
Yes, you can swap in vegetables like zucchini or finely chopped spinach. They add moisture and freshness, and the smell of fresh greens during cooking makes the kitchen lively.
3. Can I make it less spicy?
Adjust the spices according to your heat tolerance. Toasting them releases a fragrant aroma, and the spices should smell warm and inviting before adding the other ingredients.
4. How do I make it milder?
Absolutely. You can skip green chilies or reduce chili powder. The mixture will be milder but still flavorful, with a subtle kick in the aroma.
5. What oil should I use?
Use neutral oil like vegetable or sunflower oil for frying. The crackling sound when the oil heats up indicates it’s ready—if it smokes, lower the heat.
6. Can I prepare these in advance?
Yes, they can be prepared ahead. Chill the mixture for 15 minutes to make shaping easier. Reheat in a hot skillet until crispy, and you’ll enjoy that fresh crunch again.
7. What if the mixture is too wet or dry?
If the mixture feels too wet, add more breadcrumbs gradually until it holds shape. If it’s too dry, splash in a teaspoon of water and knead gently.
8. How do I know when they’re ready?
Fry the tikkis at about 180°C/355°F until golden brown and crispy. They should emit a crackling sound and smell fragrant with toasted spices, signaling they’re done.
9. How should I flip them?
Use a slotted spatula to flip carefully after 3-4 minutes per side. The edges should be crispy and golden, and the aroma will be rich with spices.
10. They fall apart while frying—what now?
If they break apart, the mixture might be too wet or not rested enough. Rest it longer or add more breadcrumbs to improve binding. Keep a close eye during frying to prevent overcooking.
Revisiting street food memories through these vegetable tikkis reminds me how simple, honest ingredients can evoke such rich nostalgia. The crispy edges and fragrant spices bring a lively, comforting note to any meal, especially when the season calls for warm, satisfying bites.
Sharing this recipe feels like passing along a piece of those bustling markets and lively kitchens. It’s about embracing the chaos, the aroma, and the joy of creating something homemade that’s full of personality. Sometimes, the messiest, most unpolished dishes turn out to be the most satisfying.

Hi, I’m Oliver Stone, the writer, cook, and storyteller behind Crying Into the Onions. I’m so glad you found your way here. This blog was born from equal parts humor, heart, and a deep love for honest cooking. I started this blog to share more than just recipes — I wanted to capture the emotions, memories, and quirks that make food more than fuel. Because sometimes, cooking makes you laugh. Sometimes, it makes you cry (into the onions, naturally). And most of all, it brings people together.

