Homemade vegetable nuggets are my little secret for turning veggies into a crispy, satisfying snack that feels like a treat. There’s something about shaping them myself that makes the whole process feel like a small victory, especially when the kids see those golden-brown bites come out of the oven. It’s comfort food with a bit of a healthy twist, and honestly, it’s a win-win for everyone.
These nuggets aren’t just about nostalgia—they’re about reclaiming the joy of childhood favorites with a fresh, honest approach. I love experimenting with different veggie combos, knowing that each batch is a little bit of homemade goodness. Plus, they smell like crispy heaven—garlicky, toasty, with a hint of baked veggie sweetness—and that’s what makes everyone reach for seconds.
Focusing on how homemade vegetable nuggets can be a satisfying, nostalgic comfort food that bridges healthy eating with childhood memories.
Nostalgic Crispy Veggie Bites
- Making these nuggets always reminds me of weekend afternoons in my childhood kitchen, the smell of toasted breadcrumbs filling the air.
- I love how crispy and golden they turn out, especially when I manage to get that perfect crunch on the outside without drying the veggies inside.
- There’s a quiet pride when I see the kids devour these, knowing I’ve sneaked in some veggies without them noticing a thing.
- Sometimes, I get a bit nostalgic and add a touch of hot sauce or a sprinkle of cheese—little tweaks that make the familiar new again.
The story behind this recipe
- This recipe came together on a rainy afternoon when I was craving something crispy but wanted to sneak in more vegetables without fuss. I remembered those frozen nuggets from childhood, but wanted to make a version that felt honest and fresh, not processed. It struck me that combining my favorite seasonal veggies with a simple coating could turn into something satisfying and true to my kitchen’s spirit.
- I started experimenting with different veggie blends, aiming for a balance of moisture and flavor that wouldn’t fall apart. The first batch was a bit too soft, but after a few tweaks—more binding agent, a chill in the fridge—they held together perfectly and baked up golden and crisp. The smell of toasted breadcrumbs mixed with roasted veggies became my signal that I’d hit the right note, and I’ve been making them ever since as a quick, wholesome snack.
- heading: The story behind this recipe
Trivia and Origins
- Vegetable nuggets as a concept likely originated from the desire to create kid-friendly, healthy snacks that mimic the familiar fried foods of childhood.
- Historically, similar snacks appeared in various cultures, turning humble vegetables into crispy bites using breading and frying or baking techniques.
- Modern recipes often emphasize baking over frying, reflecting a shift toward healthier eating habits while still satisfying that crispy craving.
Ingredient breakdown
- Carrots: I love how their natural sweetness caramelizes in the oven, giving the nuggets a subtle, smoky flavor—try swapping with parsnips for a milder, earthy twist.
- Zucchini: Its high water content can make the mixture soggy if not drained well. Squeeze out excess moisture and feel that satisfying firmness before mixing.
- Breadcrumbs: Toasted panko add that crispy crunch I crave—use regular panko if you want a softer bite, but don’t skip the toasting step for extra flavor.
- Cheese (optional): A sprinkle of grated cheddar melts into the mixture, adding richness—skip if you want a dairy-free version, but add a pinch of nutritional yeast for umami.
- Eggs: They help bind everything together, giving a tender, hold-together texture—if vegan, try flaxseed mixed with water, but expect a different chew.
- Garlic & herbs: Sautéed garlic and chopped parsley brighten the flavor and add aroma—fresh herbs are best, but dried can work in a pinch if you’re in a rush.
- Oil: A splash of olive oil in the mixture helps with browning and crisping—use avocado oil for a higher smoke point and nuttier flavor.
Spotlight on key ingredients
Carrots & Zucchini:
- Carrots: I love how their natural sweetness caramelizes in the oven, giving the nuggets a subtle, smoky flavor—try swapping with parsnips for a milder, earthy twist.
- Zucchini: Its high water content can make the mixture soggy if not drained well. Squeeze out excess moisture and feel that satisfying firmness before mixing.
Notes for ingredient swaps
- Dairy-Free: Swap cheese for nutritional yeast or a splash of coconut milk for creaminess, but expect a milder flavor.
- Gluten-Free: Use almond flour or gluten-free panko instead of regular breadcrumbs for a softer, nutty note.
- Vegan: Replace eggs with flaxseed meal mixed with water; the nuggets might be slightly less tender but still hold well.
- Low-Sodium: Opt for unsalted breadcrumbs and add herbs or spices to boost flavor without salt.
- Extra Crispy: Use finely crushed cornflakes or crispy rice cereal instead of breadcrumbs for an extra crunch.
- Herb Variations: Fresh basil or cilantro can replace parsley for a more vibrant, aromatic punch.
- Vegetable Swaps: Sweet potato or parsnips can replace carrots for different sweetness and earthy undertones.
Equipment & Tools
- Baking sheet: To hold the nuggets during baking.
- Parchment paper or silicone mat: To prevent sticking and make cleanup easier.
- Large mixing bowl: To combine all ingredients thoroughly.
- Grater: To shred vegetables finely.
- Spoon or small scoop: To shape the nuggets uniformly.
- Pastry brush or brush: To lightly oil the nuggets for crisping.
Step-by-step guide to vegetable nuggets
- Gather all ingredients: shredded carrots, zucchini, breadcrumbs, eggs, garlic, herbs, cheese (if using), and oil.
- Preheat your oven to 200°C (390°F). Line a baking sheet with parchment paper or a silicone mat.
- Drain excess moisture from zucchini: squeeze out with a clean dish towel or cheesecloth until no more water drips.
- In a large mixing bowl, combine shredded vegetables, breadcrumbs, beaten eggs, minced garlic, herbs, and cheese. Mix well until cohesive.
- Taste the mixture; adjust salt or herbs if needed. Chill in the fridge for about 15 minutes; this helps the mixture firm up.
- Use a tablespoon or small ice cream scoop to shape the mixture into nugget-sized portions, then gently flatten into discs.
- Place nuggets on the prepared baking sheet, leaving space between each. Lightly brush tops with a little oil for extra crispness.
- Bake in the preheated oven for 20-25 minutes. Flip halfway through, until golden brown and crispy at the edges.
- Check for doneness: the nuggets should be firm, golden, and smell toasted with a hint of roasted veggie sweetness.
- Remove from oven and let rest for 5 minutes. They firm up slightly as they cool, making them easier to handle.
- Serve warm, with a side of your favorite dip or just as they are, crispy and satisfying.
Let the baked nuggets rest on a cooling rack for 5 minutes. Serve immediately or store for later. For reheating, bake at 180°C (350°F) for 10 minutes until crispy.
How to Know It’s Done
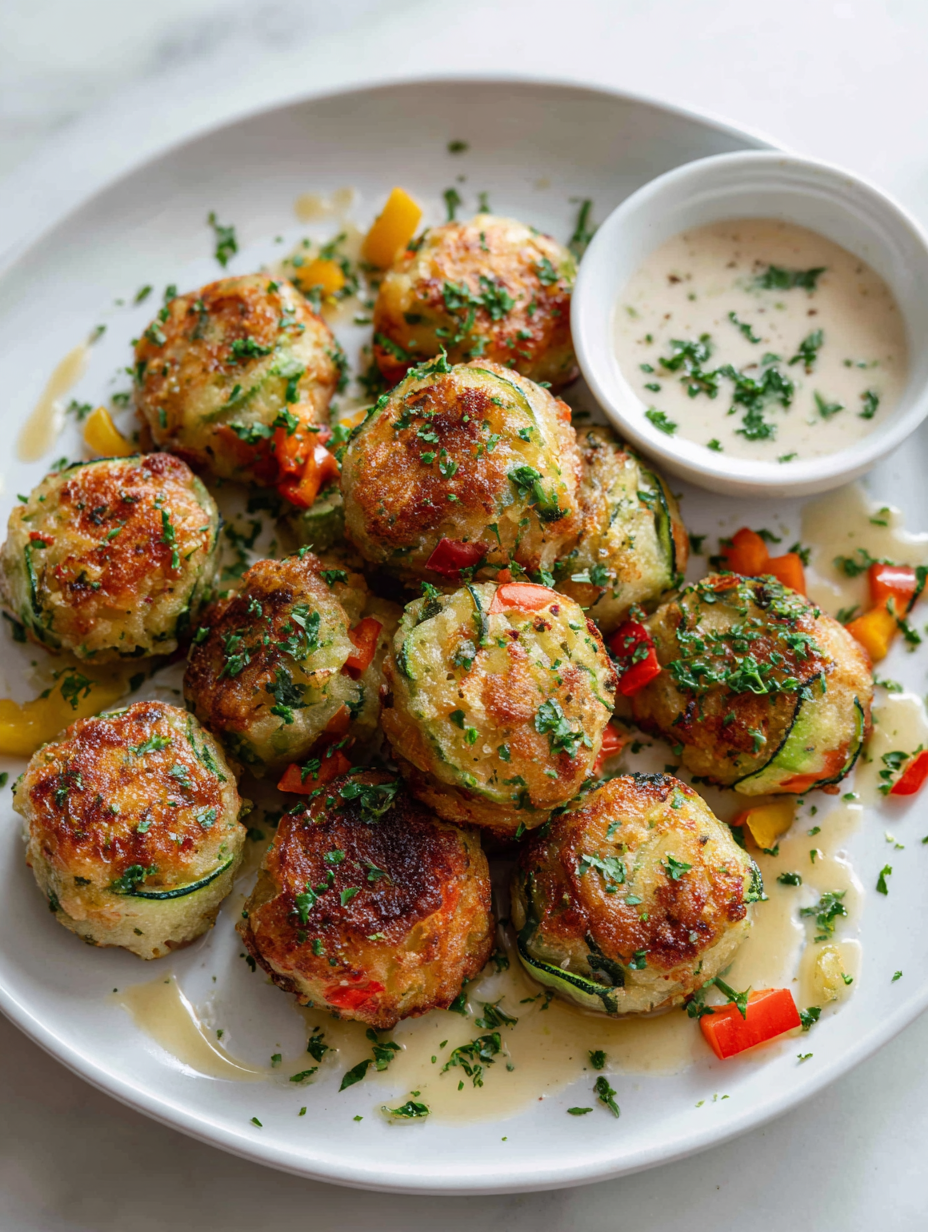
- Nuggets are golden brown and crispy on the outside.
- They hold together when gently pressed or lifted with a spatula.
- The internal texture is firm but not dry, with a slight jiggle if slightly underdone.
Nostalgic Crispy Veggie Bites
Ingredients
Equipment
Method
- Preheat your oven to 200°C (390°F) and line a baking sheet with parchment paper or a silicone mat.
- Finely grate the carrots and zucchini, then place the zucchini in a clean towel and squeeze out excess moisture until it feels firm and dry.
- In a large mixing bowl, combine the grated carrots, drained zucchini, toasted breadcrumbs, grated cheese, minced garlic, chopped parsley, and beaten egg. Mix thoroughly until everything is well incorporated.
- Taste the mixture and adjust seasoning if needed. Cover and chill in the fridge for about 15 minutes to help it firm up.
- Use a spoon or small scoop to shape the mixture into small nuggets, then gently flatten each into a disc shape.
- Place the shaped nuggets onto the prepared baking sheet, leaving space between each. Lightly brush the tops with olive oil to promote crisping.
- Bake in the oven for 20-25 minutes, flipping them halfway through, until they turn golden brown and crispy at the edges.
- Once baked, remove the nuggets from the oven and let them rest for 5 minutes on a cooling rack, allowing the exterior to set and crisp up further.
- Serve the nuggets warm, with your favorite dips or just as they are, enjoying their crispy, golden exterior and tender inside.
Pro tips for crispy nuggets
- Use a gentle hand when mixing to avoid smashing the veggies, keeping nuggets tender and cohesive.
- Chill the mixture for at least 15 minutes—this firms it up, making shaping easier and less sticky.
- When forming nuggets, press firmly to ensure they hold together during baking, avoiding crumbly bites.
- Brush the tops lightly with oil before baking—this promotes an even, golden crisp and irresistible sheen.
- Bake at 200°C (390°F) and flip halfway—watch for a deep golden color and a crackling sound indicating crispiness.
- For extra crunch, sprinkle a few crushed cornflakes or toasted breadcrumbs on top before baking.
- Rest baked nuggets for 5 minutes before serving—this helps set the structure and keeps them from falling apart.
Common mistakes and how to fix them
- FORGOT to drain zucchini → Squeeze out excess moisture for better texture.
- DUMPED the breadcrumbs too early → Toast breadcrumbs separately for maximum crunch.
- OVER-TORCHED the nuggets → Bake at 200°C (390°F) until golden, not burnt.
- MISREAD the temperature → Use a thermometer to ensure oven is at the right heat.
Quick fixes and pantry swaps
- If veggies release too much water, splash a little more flour into the mixture.
- When nuggets stick to the pan, shield with a light drizzle of oil and gently loosen.
- If nuggets are undercooked, rescue with a brief bake at 200°C (390°F) for 3-5 minutes.
- Dumped too much salt? Rinse the mixture with water before shaping to tone down the saltiness.
- Over-baked and too dark? Patch with a quick brush of oil and reduce oven temperature slightly.
Prep, store, and reheat tips
- Prepare the vegetable mixture ahead by shredding and mixing the vegetables with eggs and herbs; keep it refrigerated for up to 24 hours to maintain freshness and prevent spoilage.
- Assemble and shape the nuggets before baking; store them on a covered plate in the fridge for up to 12 hours. They might need an extra minute in the oven if chilled.
- Cooked nuggets will keep in an airtight container in the fridge for 2-3 days. Reheat in a 180°C (350°F) oven for about 10 minutes until crispy and fragrant, watching for that golden hue.
- Frozen nuggets are best stored in a single layer on a baking sheet, then transferred to a freezer bag. Freeze for up to 3 months. Reheat directly from frozen—add 5-7 minutes to baking time—for a crispy finish.
- Reheating should produce a crackling exterior and warm, tender interior. Avoid microwaving if you want to keep the crunch, as it can cause sogginess.
Top questions about vegetable nuggets
1. Should I drain the veggies before mixing?
Use finely grated carrots and zucchini, then squeeze out excess water to prevent sogginess.
2. How long and at what temperature do I bake them?
Bake at 200°C (390°F) for 20-25 minutes until golden and crispy, flipping halfway.
3. Can I make these ahead and freeze them?
Yes, you can freeze shaped nuggets on a tray, then store in a bag for up to 3 months.
4. What type of breadcrumbs works best?
Use panko breadcrumbs for extra crunch; toasted breadcrumbs add even more flavor and crispness.
5. Can I make this vegan?
You can swap eggs for flaxseed mixed with water for a vegan version, but expect a slightly different texture.
6. What dipping sauces go well with these nuggets?
Serve with your favorite dips—yogurt, spicy ketchup, or tahini—to enhance the flavor experience.
7. My mixture is too soft, what should I do?
If the mixture feels too loose, chill it in the fridge for 15 minutes to firm up for easier shaping.
8. How can I get the nuggets extra crispy?
Use a light brush of oil on the nuggets before baking for an even, golden crust and extra crispiness.
9. My nuggets are browning too fast, what now?
If they brown too quickly, lower the oven temperature slightly or cover loosely with foil.
10. How do I reheat leftovers without losing crunch?
Reheat leftovers in a 180°C (350°F) oven for 10 minutes until crispy and heated through.
These vegetable nuggets are more than just a snack; they’re a little act of rebellion against processed foods. Each crispy bite carries the scent of roasted veggies and toasted breadcrumbs, a reminder that homemade always tastes better. Making them feels honest, a simple way to reclaim some kitchen joy amid busy days.
They’re perfect when you want something satisfying without fuss—whether as a quick lunch or a crowd-pleaser at dinner. And honestly, once you get the hang of shaping and baking them, they become a go-to for sneaking more vegetables into everyday eating. No matter how many you make, they’ll disappear faster than you think.

Hi, I’m Oliver Stone, the writer, cook, and storyteller behind Crying Into the Onions. I’m so glad you found your way here. This blog was born from equal parts humor, heart, and a deep love for honest cooking. I started this blog to share more than just recipes — I wanted to capture the emotions, memories, and quirks that make food more than fuel. Because sometimes, cooking makes you laugh. Sometimes, it makes you cry (into the onions, naturally). And most of all, it brings people together.

