Potato fritters are one of those simple pleasures that can be tricky to get just right. Everyone loves that crackly, golden exterior, but it’s easy to end up with a soggy or greasy mess if you’re not careful. I’ve spent years tinkering, trying to find that perfect balance between crispness and tender potato inside.
What I’ve learned is that the secret isn’t in the frying alone but in paying attention to the details—how you prepare the potatoes, the oil temperature, and even the resting time. It’s a bit of a dance, but once you get it, these fritters become a go-to snack or side that’s deeply satisfying without any fuss.
This recipe is my take on that elusive crispy shell, with a focus on technique that guarantees that satisfying crunch every time. It’s honest, straightforward, and a little messy—just like making good fritters should be.
Focusing on the overlooked art of achieving the perfect crisp exterior while keeping the potato interior tender and flavorful, a balance often missed in casual fry-ups.
The overlooked art of crispness
- Falling in love with that first crispy bite, it’s pure joy to get it just right.
- Messing up a batch used to frustrate me, but now I see it as part of the learning process.
- Nothing beats the nostalgic smell of frying potatoes that takes me straight back to childhood kitchens.
- Seeing the perfect golden fritter on my plate makes all the tweaking worth it.
- These fritters remind me that sometimes, simple comfort food needs a little patience and care.
The origin of my crispy obsession
Growing up, my grandmother’s kitchen was filled with the irresistible aroma of frying potatoes, a smell that still pulls me back every time I make these fritters. I remember her tearing apart a big batch of potatoes, the sound of grating them echoing in the small, bustling space. Over the years, I’ve realized that perfect potato fritters aren’t about complicated ingredients but about respecting the simple process and paying attention to those tiny details that make all the difference. This recipe is my attempt to capture that nostalgic magic with a little extra crunch and a lot of heart.
Fascinating facts about potato fritters
- Potato fritters have roots in many cuisines, from Eastern European latkes to Indian aloo pakoras, each with unique twists.
- Historically, fritters were a way to make humble ingredients like potatoes stretch further, especially during lean times.
- The technique of achieving a crispy exterior while keeping the inside tender dates back centuries, with variations across regions.
- In some cultures, fritters were served during festivals or special occasions, symbolizing abundance and celebration.
Key ingredients for crispy fritters
- Russet potatoes: I prefer these for their starchy, fluffy interior that crisps up beautifully; if you want less starch, try Yukon Gold, but watch out for sogginess.
- Onion: A small finely chopped onion adds a gentle sweetness and moisture, but if you dislike onion, skip it—your fritters will still be tasty.
- Flour: I use all-purpose flour for structure; for a gluten-free version, rice flour works but results in a slightly lighter crunch, so adjust the amount.
- Eggs: They hold everything together, but if you’re vegan, a flaxseed slurry (1 tbsp flaxseed meal + 3 tbsp water) can substitute—just expect a slightly different texture.
- Oil for frying: I go for neutral oils like vegetable or canola; if you want more flavor, a touch of sesame oil adds aroma but watch the heat—burnt sesame is bitter.
- Salt & pepper: Essential for flavor, but don’t skimp on the salt; a pinch of smoked paprika can add a smoky depth, especially if you love a bit of heat.
- Optional herbs: Chopped parsley or chives lift the fritters with fresh brightness, but if you’re out, a sprinkle of dill or thyme works just as well.
Spotlight on key ingredients
Potatoes:
- Russet potatoes: I prefer these for their starchy, fluffy interior that crisps up beautifully; if you want less starch, try Yukon Gold, but watch out for sogginess.
- Onion: A small finely chopped onion adds a gentle sweetness and moisture, but if you dislike onion, skip it—your fritters will still be tasty.
Binding agents:
- All-purpose flour: I use this for structure; it creates a reliable crust, but rice flour makes them lighter, though slightly more delicate.
- Eggs: They hold everything together, offering a tender crumb inside; vegan? Try a flaxseed slurry, but expect a denser texture.
Notes for ingredient swaps
- Starchy potatoes: Russets are my go-to for that fluffy interior; if you want less starch, Yukon Golds are a decent swap, but expect a slightly softer bite.
- Onion: Finely chopped onion adds sweetness and moisture, but if you’re not a fan, skip it—your fritters will still turn out tasty and tender.
- Flour: All-purpose flour provides good structure; for gluten-free, try rice or chickpea flour, but note they may make the crust a tad lighter or nuttier.
- Eggs: They bind everything together, but for a vegan version, use a flaxseed slurry (1 tbsp flaxseed meal + 3 tbsp water), which works well though slightly denser.
- Oil for frying: Neutral oils like vegetable or canola are best; if you want a hint of flavor, sesame oil is nice but use it sparingly to prevent burning.
- Salt & pepper: Essential for flavor, but you can add paprika or cayenne for a smoky or spicy kick—adjust to taste.
- Herbs: Fresh parsley or chives brighten the flavor, but dried herbs like dill or thyme can be used if fresh is unavailable.
Equipment & Tools
- Large mixing bowl: to combine ingredients
- Grater: to shred potatoes and onion
- Cheesecloth: to drain excess moisture
- Frying pan: for even frying
- Slotted spoon: to handle fritters
- Kitchen thermometer: to monitor oil temperature
- Paper towels: for draining
- Spatula: to flip fritters
Step-by-step guide to pan searing
- Equipment & Tools:
– Large mixing bowl: to combine ingredients.
– Grater: to shred potatoes and onion.
– Cheesecloth or clean towel: for draining excess moisture.
– Frying pan (10-inch): for even frying.
– Slotted spoon: to handle fritters.
– Kitchen thermometer: to monitor oil temp.
– Paper towels: for draining.
– Spatula: to flip fritters.1. Prepare the potatoes:
– Peel and grate 2 large russet potatoes.
– Place grated potatoes in cheesecloth and squeeze out as much moisture as possible.
– Set aside.
2. Prepare the mixture:
– In a large bowl, combine grated potatoes, 1 small finely chopped onion, 2 beaten eggs, 1/4 cup all-purpose flour, 1/2 teaspoon salt, and pepper to taste.
– Mix until well combined.
3. Heat the oil:
– Pour about 1 inch of vegetable oil into the pan.
– Heat over medium heat to 180°C (350°F). Use the thermometer to check.
– The oil should shimmer and crackle when ready.
4. Fry the fritters:
– Take about 2-3 tablespoons of mixture and form into a patty.
– Gently place in hot oil.
– Fry in batches, avoiding overcrowding.
– Cook for about 3-4 minutes per side until golden brown.
– Use the slotted spoon to flip and remove.
5. Check for doneness:
– Fritters should be crispy and deep golden.
– The interior should be tender and fluffy.
– No excess oil should remain.
– If soggy, fry a bit longer.
6. Rest and serve:
– Drain fritters on paper towels.
– Let rest for 2 minutes.
– Serve warm, with a squeeze of lemon or your favorite sauce.Resting & Finishing:
– Rest the fritters briefly on paper towels to absorb excess oil. Serve immediately for maximum crunch.Checkpoints:
– Crackling sound and shimmer in oil.
– Golden brown exterior.
– Interior feels tender when pressed gently. - heading
- SHORT section title (3-8 words max). Example: ‘Step-by-step guide to pan searing’
- checkpoints
- array of 3 key doneness tests for crispy exterior and tender interior.
- equipment_tools
- array of objects listing tools and purpose.
- resting_finishing
- Brief instructions for resting and plating.
- additionalProperties
- false
- description
- Unique H2 for step-by-step guide, including equipment, steps, finishing, checkpoints.
- type
- object
- required
- heading
- equipment_tools
- steps
- resting_finishing
- checkpoints
- properties
- heading
- equipment_tools
- steps
- resting_finishing
- checkpoints
- steps
- array
- checkpoints
- array
- equipment_tools
- array
- resting_finishing
- string
- description
- string
- additionalProperties
- false
- type
- object
- properties
- heading
- equipment_tools
- steps
- resting_finishing
- checkpoints
- required
- heading
- equipment_tools
- steps
- resting_finishing
- checkpoints
- equipment_tools
- array
- steps
- array
- checkpoints
- array
- resting_finishing
- string
- heading
- SHORT section title (3-8 words max). Example: ‘Step-by-step guide to pan searing’
- description
- Unique H2 for step-by-step guide, including equipment, steps, finishing, checkpoints.
- additionalProperties
- false
- type
- object
- properties
- heading
- equipment_tools
- steps
- resting_finishing
- checkpoints
- required
- heading
- equipment_tools
- steps
- resting_finishing
- checkpoints
- steps
- array
- checkpoints
- array
- equipment_tools
- array
- resting_finishing
- string
- description
- Unique H2 for step-by-step guide, including equipment, steps, finishing, checkpoints.
- additionalProperties
- false
Drain the fritters on paper towels, let rest for 2 minutes to set the crust, then serve immediately for maximum crunch.
How to Know It’s Done
- Oil shimmered and crackled at 180°C (350°F)
- Fritters turned golden brown after 3-4 mins per side
- Interior is tender and fluffy when pressed
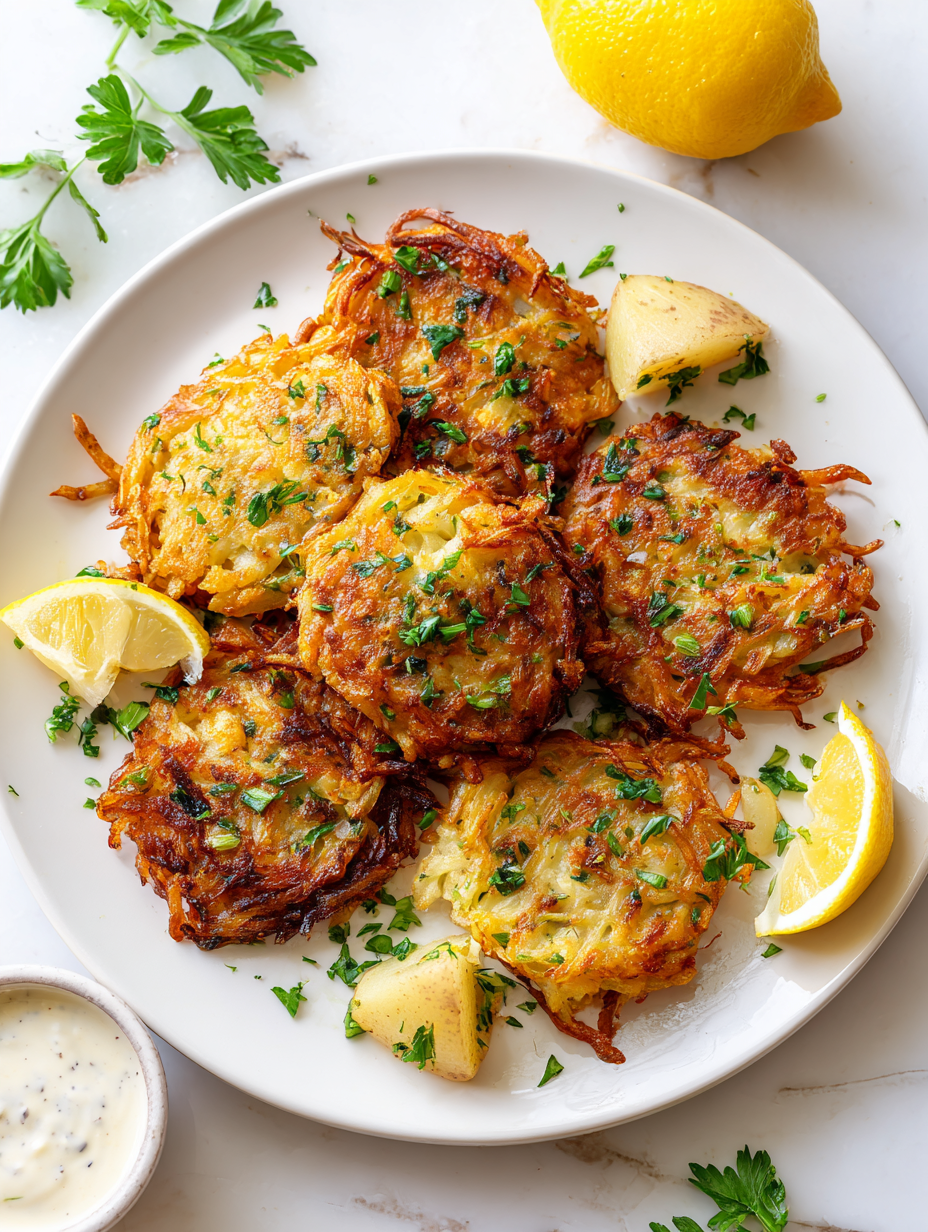
Crispy Potato Fritters
Ingredients
Equipment
Method
- Start by peeling and grating the potatoes into a large bowl. Immediately squeeze out as much moisture as possible using cheesecloth or a clean towel—this step helps achieve that crispy exterior.
- Add the finely chopped onion to the grated potatoes, then pour in the beaten eggs and sprinkle with flour, salt, and pepper. Mix everything together until well combined; the mixture should be moist but not runny.
- Pour enough oil into a frying pan to reach about 1 inch deep and heat over medium heat. Use a kitchen thermometer to ensure the oil reaches around 180°C (350°F)—you'll see it shimmer and crackle when ready.
- Using a tablespoon or your hands, form small patties from the potato mixture. Carefully slide a few into the hot oil, making sure not to overcrowd the pan, which helps them crisp evenly.
- Fry the fritters for about 3-4 minutes on each side, until they turn a deep golden brown and emit a crackling sound. Use a slotted spoon to gently flip and remove them once crispy.
- Transfer the cooked fritters to paper towels to drain excess oil. Rest them for 2 minutes to help set the crust and prevent sogginess.
- Repeat with the remaining mixture, maintaining the oil temperature for consistent crispiness. Keep cooked fritters warm in a low oven if needed.
- Serve the fritters hot, ideally with a squeeze of lemon or your favorite dipping sauce. Enjoy that perfect crunch with tender, flavorful potato insides!
Notes
Pro tips for perfect potato fritters
- Bolded mini-head: Use a slotted spoon to gently lower fritters into hot oil to avoid splatters and ensure even cooking.
- Bolded mini-head: Keep the oil at a steady 180°C (350°F); use a thermometer to prevent burning or sogginess.
- Bolded mini-head: Squeeze out excess moisture from grated potatoes; it’s the key to achieving that crispy exterior.
- Bolded mini-head: When flipping, do so carefully; wait until fritters are golden and firm enough to hold their shape.
- Bolded mini-head: Rest cooked fritters on paper towels briefly; this helps absorb excess oil and keeps them crisp.
- Bolded mini-head: For extra crunch, double fry the fritters: a quick second fry at higher heat for 30 seconds boosts crispiness.
Common mistakes and how to fix them
- TOO DRY: Overmixing the batter makes fritters dense; gently fold to keep them light.
- TOO SOGGY: Not draining potatoes well causes soggy fritters; squeeze out as much moisture as possible.
- INCONSISTENT HEAT: Frying at uneven temperature burns exterior; use a thermometer for steady 180°C (350°F).
- OVER CROWDING: Fry in small batches; overcrowding lowers oil temperature, resulting in greasy fritters.
Quick fixes and pantry swaps
- When fritters fall apart, gently lower them again and cook longer to firm up.
- If oil shimmers too much, lower heat slightly to prevent burning.
- Splash a bit of cold water into hot oil if crackling gets too vigorous.
- Patch soggy spots by pressing them back into shape and frying a bit longer.
- Shield delicate fritters with a paper towel to absorb excess oil and shimmer.
Prep, store, and reheat tips
- Prep the grated potatoes and squeeze out excess moisture a day ahead; keep refrigerated in an airtight container for up to 24 hours. The cooler it stays, the less soggy the fritters will be.
- Mix the batter with eggs and flour the night before, cover tightly, and store in the fridge. It will thicken slightly, but stir before using to loosen.
- Fritters are best eaten fresh, but leftovers can be stored in a single layer in the fridge for up to 2 days. Reheat in a hot skillet until crispy, about 2-3 minutes per side, with a faint crackle of oil.
- Refrigerated fritters will lose some crispness, so reheating well is key. Expect a softer bite, but a quick revive in hot oil or oven will restore some crunch.
- Avoid freezing raw batter—texture becomes rubbery once thawed. Cooked fritters freeze well for up to a month; reheat directly from frozen in a hot skillet or oven.
Top questions about potato fritters
1. Can I use different potatoes?
Use starchy potatoes like Russets for the best crispy crust and fluffy inside. Yukon Golds work too, but watch for sogginess.
2. Can I make these without onion?
Yes, skipping the onion still yields tasty fritters, but adding it gives a sweet, moist contrast to the crunch.
3. What if I don’t have all-purpose flour?
All-purpose flour helps bind the mixture. Rice or chickpea flour can be substitutes, but they might alter the texture slightly.
4. Can I make these vegan?
Eggs bind and add structure. For vegans, flaxseed slurry (1 tbsp flaxseed meal + 3 tbsp water) works well, though they might be a bit denser.
5. What oil should I use for frying?
Use neutral oils like vegetable or canola for frying. Sesame oil adds aroma but can burn if the temperature gets too hot.
6. How can I spice up the fritters?
Salt enhances flavor; you can add smoked paprika or cayenne for extra depth or spice, adjusting to your taste.
7. Can I add herbs or spices?
Fresh herbs like parsley or chives brighten the flavor. Dried herbs like dill or thyme are good if fresh isn’t available.
8. How hot should the oil be?
Ensure the oil is at 180°C (350°F); too low makes soggy fritters, too high burns the outside before the inside cooks.
9. How do I keep the fritters crispy?
Drain grated potatoes thoroughly and squeeze out excess moisture to prevent sogginess and help achieve that crispy exterior.
10. How do I reheat leftovers?
Fritters are best enjoyed fresh while crispy. Reheat in a hot skillet for 2-3 minutes, or in the oven at 180°C (350°F) until warmed and crunchy.
Making these potato fritters is a reminder that simplicity, when done with care, yields the most satisfying crunch. There’s a quiet pleasure in watching them turn golden and crispy, filling the kitchen with that warm, toasted potato scent. Sometimes, it’s the humble things—like a well-fried fritter—that bring a little bit of comfort to the day.
These fritters are more than just a snack; they’re a small act of patience and attention, a way to slow down and enjoy the process. Once you get that perfect crackle, every bite feels like a quiet celebration of good, honest cooking.

Hi, I’m Oliver Stone, the writer, cook, and storyteller behind Crying Into the Onions. I’m so glad you found your way here. This blog was born from equal parts humor, heart, and a deep love for honest cooking. I started this blog to share more than just recipes — I wanted to capture the emotions, memories, and quirks that make food more than fuel. Because sometimes, cooking makes you laugh. Sometimes, it makes you cry (into the onions, naturally). And most of all, it brings people together.

