
Lemon bars are one of those desserts that seem simple but carry a punch of brightness that can lift any mood. It’s that perfect balance of tart and sweet, with a chewy, buttery crust anchoring the tangy lemon filling. I’ve always loved how a slice of these can brighten a teatime or serve as a fresh finish after a heavy dinner.
What makes this recipe special isn’t just the flavor, but how forgiving it feels—like a cozy, familiar project in the kitchen. The lemon’s zing wakes up your senses, and the process of zesting, mixing, and baking feels almost meditative, a little ritual that rewards you with something truly refreshing. It’s a dessert that makes you smile before you even take the first bite.
Focusing on how the tangy brightness of lemon can uplift even the simplest dessert, making it a versatile treat for any season or mood.
The story behind this recipe
- I remember the first time I made lemon bars in my tiny apartment’s cramped kitchen. The zesting, the fragrant lemon juice that filled the air—something about it felt like capturing sunshine in a pan. I stumbled through the process, but that bright burst of flavor made me realize how simple ingredients could turn into something unexpectedly joyful.
- Lemon bars became my go-to when I needed a little bright spot during dull weeks or a quick gift for friends. Over the years, I kept tweaking the crust and adjusting the lemon ratio, but the core idea remains the same—fresh, tangy, and so satisfying. It’s one of those recipes that feels as alive and spontaneous as a good conversation.
- heading
- story_type
Key Ingredients Breakdown
- Lemon zest: I love how the tiny grated bits burst with citrus aroma, adding brightness. For a more mellow flavor, skip the zest and focus on lemon juice.
- Lemon juice: Freshly squeezed makes a noticeable difference—more vibrant and zesty. If you’re in a pinch, bottled works, but taste the tartness first.
- Butter: I prefer unsalted, so I can control the salt. Use cold, cubed butter to keep the crust flaky, but if it melts a bit, don’t fret—still delicious.
- Sugar: Granulated for sweetness; I sometimes add a pinch more if the lemons are less tart. For a slightly less sweet crust, cut back a tablespoon.
- Eggs: They give the filling that smooth, cohesive texture. For a richer filling, add an extra yolk, but watch for over-cooking. Keep the eggs at room temp for easy mixing.
- Flour: All-purpose works best for the crust; I sift it to avoid lumps. If you want a gluten-free version, almond flour can be a good substitute—just expect a different texture.
- Powdered sugar: Dusting on top adds a soft, sweet finish. For a slightly tangy twist, sprinkle with a bit of finely chopped mint or basil right before serving.
Spotlight on key ingredients
Lemon:
- Lemon zest: I love how the tiny grated bits burst with citrus aroma, adding brightness. For a more mellow flavor, skip the zest and focus on lemon juice.
- Lemon juice: Freshly squeezed makes a noticeable difference—more vibrant and zesty. If you’re in a pinch, bottled works, but taste the tartness first.
Butter & Sugar:
- Butter: I prefer unsalted, so I can control the salt. Use cold, cubed butter to keep the crust flaky, but if it melts a bit, don’t fret—still delicious.
- Sugar: Granulated for sweetness; I sometimes add a pinch more if the lemons are less tart. For a slightly less sweet crust, cut back a tablespoon.
Notes for ingredient swaps
- Lemon Juice: Freshly squeezed offers a zesty, bright punch that bottled juice can’t quite match. If in a pinch, go for high-quality bottled, but taste beforehand.
- Butter: Unsalted butter gives you control over salt; for a dairy-free crust, coconut oil can work, though it’ll add a slight coconut flavor and different texture.
- Sugar: White granulated sugar keeps the sweetness clean; for a touch of complexity, swap with honey or maple syrup—reduce liquid elsewhere accordingly.
- Flour: All-purpose flour is reliable; almond flour makes a gluten-free crust with a nutty flavor but can be denser, so expect a slightly different bite.
- Powdered Sugar: Dusting with powdered sugar adds a soft sweetness, but for a herbal twist, try dusting with finely chopped mint or basil just before serving.
Equipment & Tools
- 9-inch square baking pan: To bake the crust and filling evenly.
- Whisk: For mixing eggs, sugar, and lemon juice smoothly.
- Mixing bowls: To combine ingredients without mess.
- Zester: To extract fragrant lemon zest.
- Spatula: To spread and smooth the crust and filling.
- Fine-mesh sieve: To strain lemon juice and pulp for smooth filling.
Step-by-step guide to Lemon Bars
- Equipment & Tools: Prepare a 9-inch square baking pan, a whisk, mixing bowls, a zester, a spatula, and a fine-mesh sieve. The pan is for baking; the whisk and bowls for mixing; the zester for lemon zest; the sieve to remove pulp from juice.
- Make the crust: In a bowl, combine 1 1/2 cups all-purpose flour, 1/4 cup powdered sugar, and 1/4 teaspoon salt. Add 1/2 cup cold, cubed unsalted butter. Use a pastry cutter or fingers until mixture resembles coarse crumbs. Press evenly into the bottom of the prepared pan. Bake at 175°C (350°F) for 20 minutes until lightly golden.
- Prepare the filling: While crust bakes, zest and juice 2 large lemons. Strain the juice through a sieve into a bowl, removing pulp. Whisk together 4 large eggs, 1 1/2 cups granulated sugar, the lemon zest, and 1/4 cup flour until smooth. Stir in lemon juice and 1/4 teaspoon salt.
- Assemble and bake: Pour the lemon filling over the hot crust. Return to the oven and bake at 175°C (350°F) for 20-25 minutes. The filling should be set around the edges but slightly jiggly in the center.
- Cool and set: Remove from oven, let cool in the pan for 15 minutes, then transfer to a wire rack. Chill in the fridge for at least 2 hours, or until completely cold and firm.
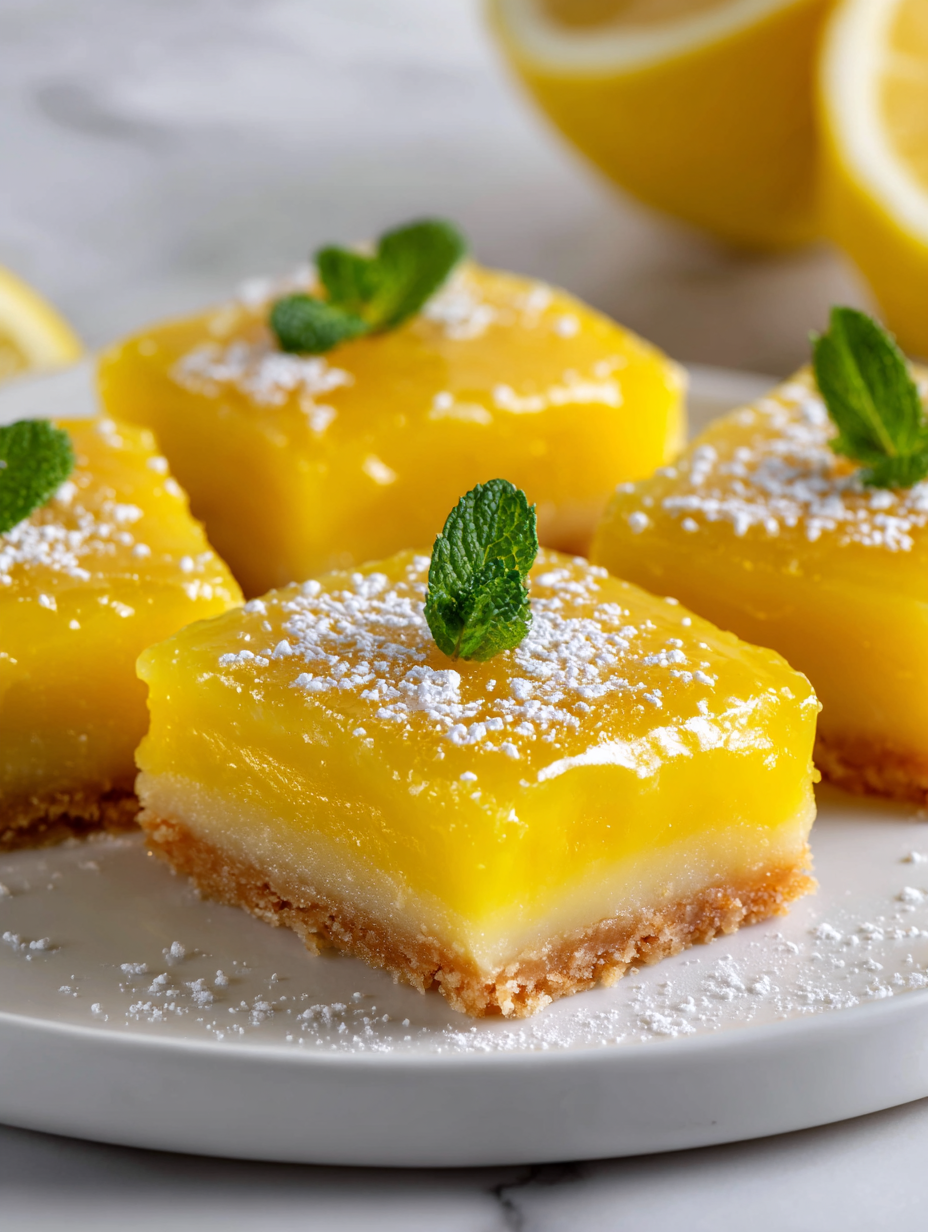
- Finish and serve: Dust with powdered sugar before slicing. Use a sharp knife to cut into squares. Serve chilled, with a hint of lemon aroma on the nose.
- Equipment & Tools: Use a sharp knife for slicing, a sifter for powdered sugar, and a wire rack for cooling. These keep the process smooth and the presentation neat.
Cool in the pan for 15 minutes, then refrigerate at least 2 hours until firm. Dust with powdered sugar just before slicing and serving for a clean, sweet finish.
How to Know It’s Done
- Crust edges should be golden and firm after baking.
- Filling should be mostly set but slightly wobbly in the center when removed from oven.
- Lemon aroma should be fragrant and bright before serving.
Lemon Bars
Ingredients
Equipment
Method
- Preheat your oven to 175°C (350°F). In a mixing bowl, combine 1 1/2 cups flour, 1/4 cup powdered sugar, and 1/4 teaspoon salt. Add the cold, cubed butter and use a pastry cutter or your fingers to work it into the flour mixture until it resembles coarse crumbs. Press this mixture evenly into the bottom of your prepared 9-inch square baking pan. Bake for 20 minutes until the edges are just turning golden and the crust looks set.
- While the crust is baking, zest both lemons using a zester, then juice them into a bowl, straining out any pulp using a fine-mesh sieve. In a separate bowl, whisk together the eggs, granulated sugar, lemon zest, and 1/4 cup flour until smooth and slightly thickened. Stir in the strained lemon juice until well combined and glossy.
- Once the crust has baked and cooled slightly, pour the lemon filling over it, spreading evenly with a spatula. Return the pan to the oven and bake for an additional 20–25 minutes, until the filling is just set around the edges but still slightly jiggly in the center. The top should be glossy and vibrant yellow.
- Remove the lemon bars from the oven, let them cool in the pan for about 15 minutes, then transfer to a wire rack. Chill in the refrigerator for at least 2 hours until fully set and cold. This helps the flavors meld and makes slicing easier.
- Before serving, dust the top with powdered sugar for a soft, sweet finish. Use a sharp knife warmed slightly to cut clean, neat squares. Serve chilled and enjoy the bright, tangy flavor with a tender, buttery crust.
Pro tips for perfect lemon bars
- Bolded mini-head: Use cold butter in the crust to keep it flaky and tender.
- Bolded mini-head: Zest the lemons before juicing; the aromatic oils are most potent then.
- Bolded mini-head: Strain lemon juice to remove pulp for a smooth, tangy filling.
- Bolded mini-head: Bake the crust until lightly golden before adding the filling to prevent sogginess.
- Bolded mini-head: Chill the bars thoroughly—at least 2 hours—for clean slices and intensified lemon flavor.
- Bolded mini-head: Dust with powdered sugar just before serving for a soft, sweet finish.
- Bolded mini-head: Use a sharp knife warmed slightly to get clean, neat squares.
Common mistakes and how to fix them
- FORGOT to chill the crust: Keep it cold for flakiness, or it’ll turn greasy when baked.
- DUMPED lemon juice directly: Strain out pulp for a smooth, bright filling—pulp can cause bitterness.
- OVER-TORCHED crust: If edges brown too fast, cover with foil or reduce oven temperature slightly.
- MISSED resting time: Chill the bars thoroughly to set the filling and enhance lemon flavor.
Quick fixes and pantry swaps
- If lemon juice is pulpy, strain it through a fine sieve for a smooth filling.
- When crust is too greasy, chill the dough before pressing into the pan.
- Splash a few drops of water on the crust if it cracks during pressing—keeps it pliable.
- Patch a cracked crust with extra dough and press gently to seal gaps.
- Shield edges with foil if they brown too quickly during baking—keep that perfect golden hue.
Prep, store, and reheat tips
- Prepare the crust and bake it fully; it firms up and becomes easier to cut later, plus it prevents sogginess.
- The lemon filling can be made a day ahead—cover tightly and refrigerate. The bright citrus flavor deepens overnight.
- Bars keep well in an airtight container in the fridge for up to 3 days. The lemon aroma intensifies as it chills.
- For longer storage, freeze the bars wrapped in plastic wrap and then foil for up to a month. Thaw in the fridge before serving.
- Reheat slightly in a low oven (around 150°C/300°F) for 10 minutes until warm. Expect a fragrant lemon scent and a slightly softer texture.
Top questions about lemon bars
1. Can I use bottled lemon juice?
Use freshly squeezed lemon juice for the brightest, most vibrant flavor; bottled works but may be less punchy.
2. Is lemon zest necessary?
Yes, but freshly grated lemon zest really boosts the citrus aroma and tang—don’t skip it if you can.
3. How do I know when the bars are done?
The crust should be golden and slightly firm; the filling jiggly but set around the edges, with a bright lemon scent.
4. How long should I chill the lemon bars?
Chill the bars in the fridge for at least 2 hours so they set properly and slice easily.
5. When should I dust the lemon bars with powdered sugar?
Dust with powdered sugar just before serving to keep it light and prevent melting or sogginess.
6. How do I get neat slices?
Use a sharp knife warmed slightly to cut clean, neat squares without cracking or sticking.
7. What if my crust is too greasy?
If the crust is too greasy, chill the dough before pressing or reduce the butter slightly.
8. How do I prevent overbaking?
Overbaking can dry out the filling, so watch for a slight jiggle in the center when you remove it from the oven.
9. Can I freeze lemon bars?
You can freeze the assembled bars (wrapped well) for up to a month; thaw in fridge before serving.
10. What if the lemon filling is pulpy?
If your lemon filling is pulpy, strain it through a fine sieve before pouring into the crust for smoothness.
These lemon bars are more than just a treat—they’re a reminder that simple ingredients can create something unexpectedly joyful. The bright, zesty flavor lingers, making them perfect for any season or occasion. Once you get the hang of it, these bars might just become your go-to for a quick, satisfying dessert.
There’s a certain satisfaction in slicing through that glossy, lemon-bright surface and seeing the tender crust beneath. Sharing these with friends or keeping a few for yourself feels like a small act of brightness in an ordinary day. Sometimes, the simplest desserts carry the most memorable moments.
Hey there — I’m Olivia “Liv” Carter, founder, recipe crafter, and storyteller behind Crying Into The Onions. I live somewhere in the heartland of the United States, where seasons change boldly, the smell of onions sizzling in a pan is a love language, and the kitchen is my favorite place to get messy and find magic.
I started this blog to share more than just recipes — I wanted to capture the emotions, memories, and quirks that make food more than fuel. Because sometimes, cooking makes you laugh. Sometimes, it makes you cry (into the onions, naturally). And most of all, it brings people together.