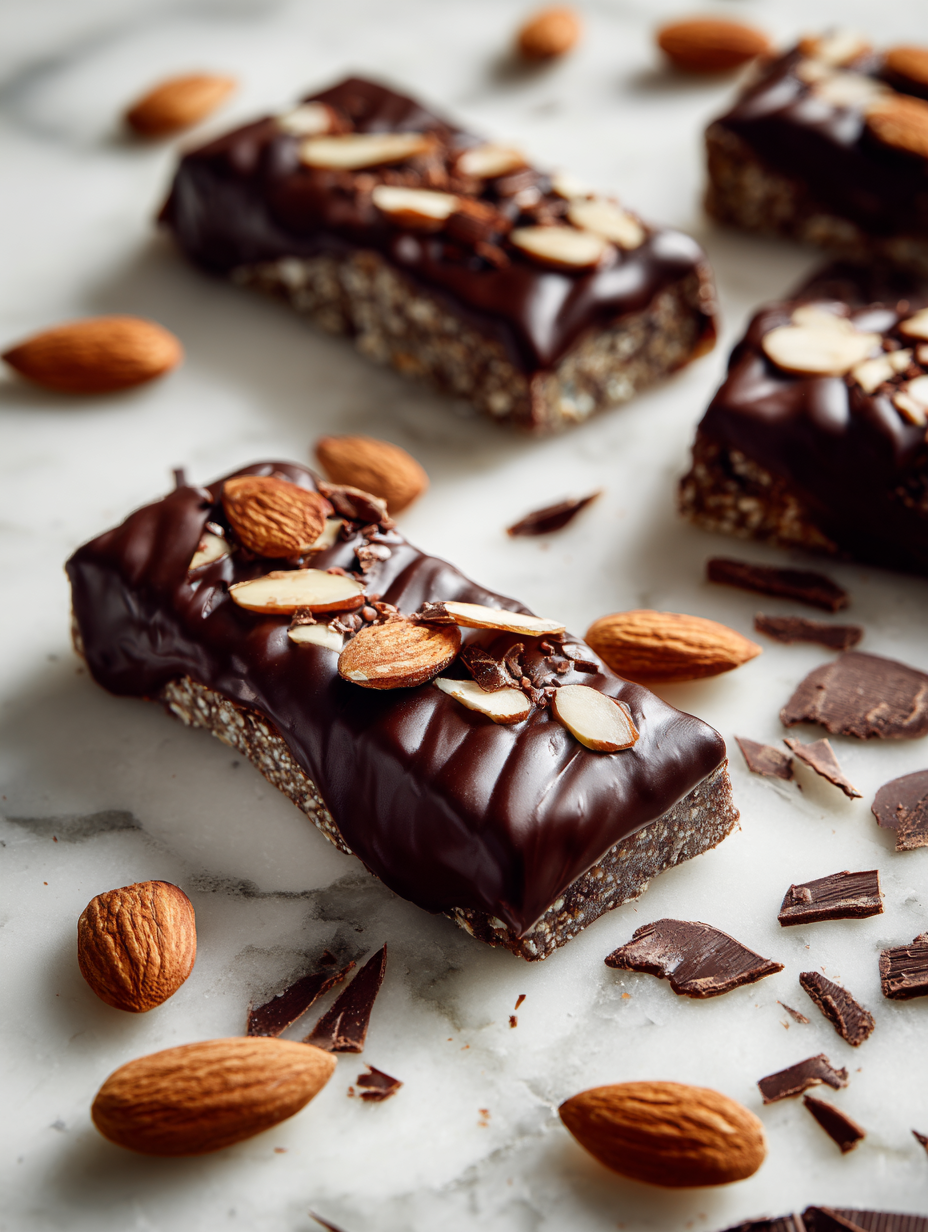
When I first started tinkering with homemade chocolate almond bars, I realized how easy it is to get lost in the pursuit of perfect sweetness. It’s about finding that sweet spot where the chocolate isn’t overpowering but just enough to highlight the toasted almonds’ nutty warmth. That crunch, that subtle saltiness—it’s the kind of balance that keeps you reaching back for another bite.
This recipe isn’t just about making a treat; it’s about mastering texture contrast. I love how the crispy, buttery base plays against the smooth, rich chocolate and the firm crunch of almonds. It’s a simple pleasure that feels carefully layered, like an underrated symphony in every square. Honestly, it’s those tiny details—like how deeply toasted the almonds are or how shiny the chocolate glaze turns—that really make a difference.
What makes these bars special isn’t just their flavor but the way they come together with such straightforward ingredients and a little patience. It’s the kind of baking that rewards small tweaks—more salt here, a touch less sugar there—and makes you feel like a quiet, humble artist in your own kitchen. Plus, they’re perfect for whenever I need a quick, honest homemade fix that’s both satisfying and just slightly fancy.
Focusing on the overlooked art of balancing sweetness and crunch in homemade chocolate almond bars, emphasizing the importance of texture contrast and subtle flavor layering.
The story behind this recipe
I first made these chocolate almond bars on a rainy afternoon when I needed something sweet but not overly indulgent. The moment I toasted the almonds and saw their rich brown glow, I knew I wanted to create something that celebrated that nutty aroma. It’s funny how a simple idea—crunchy almonds and glossy chocolate—can turn into a little ritual, reminding me that sometimes, the best treats are built on humble ingredients and patience. Now, they’re my go-to for whenever I need a quick, honest fix that feels a bit special.
Key ingredients and their quirks
- Almonds: I always toast mine until they’re golden and fragrant, that smoky aroma really deepens the flavor—try slightly under-toasting if you want a softer bite.
- Dark chocolate: I prefer a bar with at least 70% cocoa; it melts smoothly and balances sweetness with a rich, slightly bitter edge—use good quality for that glossy finish.
- Butter: I melt it gently to keep the base tender and rich; if you want a nuttier flavor, toss in a pinch of sea salt while melting.
- Honey or golden syrup: Adds a subtle floral note and helps the chocolate set with a lovely sheen—if you’re out, maple syrup works but adds a different aroma.
- Salt: I sprinkle a tiny pinch on top of the finished bars for contrast; don’t skip it, even a small amount makes the chocolate pop.
- Baking parchment: I line my pan generously—cheaper parchment can stick, so look for one with silicone coating if you want easy release.
- Vanilla extract: I add a splash to the chocolate for depth; skip it if you prefer a purer, more straightforward nutty flavor.
Spotlight on key ingredients
Almonds:
- I toast mine until they’re golden and fragrant, that smoky aroma really deepens the flavor—try slightly under-toasting if you want a softer bite.
- They add a rich crunch and nutty warmth, with a hint of smoky sweetness that amplifies when toasted.
Dark chocolate:
- I prefer a bar with at least 70% cocoa; it melts smoothly and balances sweetness with a rich, slightly bitter edge—use good quality for that glossy finish.
- Its glossy shine and smooth melt make the bars feel indulgent, with a deep cocoa aroma that fills the kitchen.
Notes for ingredient swaps
- Dairy-Free: Use coconut oil instead of butter for a dairy-free crust. The flavor will be a bit more tropical and less rich.
- Vegan Chocolate: Swap dark chocolate with a high-quality vegan variety. Expect a slightly different melt and a less intense cocoa flavor.
- Sweetener: Replace honey with maple syrup or agave nectar. Maple adds a smoky sweetness, while agave is milder and more neutral.
- Nut Variations: Almonds can be replaced with hazelnuts or pecans. Each brings a unique aroma and crunch, changing the overall flavor profile.
- Salt: Use sea salt flakes instead of regular table salt for a crunchier texture and a more delicate saltiness that accentuates the chocolate.
- Crust Base: Substitute graham crackers with digestive biscuits or even crushed pretzels for a salty contrast and different texture.
- Chocolate Type: For a different flavor, try milk chocolate or white chocolate, but keep in mind they are sweeter and less bitter than dark chocolate.
Equipment & Tools
- Baking pan: To hold the crust and chocolate layer for easy assembly.
- Parchment paper: Prevents sticking and makes removal easier.
- Heatproof bowl: For melting chocolate gently with indirect heat.
- Saucepan: To create a double boiler for melting chocolate.
- Spatula: To stir and spread melted chocolate evenly.
- Knife: To cut the bars cleanly.
Step-by-step guide to chocolate almond bars
- Gather your equipment: 20cm square baking pan, parchment paper, heatproof bowl, saucepan, spatula, and knife. Line the pan with parchment, leaving overhang for easy removal.
- Toast the almonds: Preheat oven to 180°C (350°F). Spread almonds on a baking sheet, toast for 8-10 minutes until fragrant and golden. Cool completely.
- Make the crust: Melt 100g butter over low heat, stir in 150g crushed graham crackers or digestive biscuits, and 50g sugar. Mix until combined.
- Press the crust: Transfer mixture to prepared pan, press evenly with the back of a spoon. Chill in the fridge for 15 minutes to set.
- Prepare the chocolate topping: Break 200g dark chocolate into pieces. Set a heatproof bowl over a simmering pot of water (about 80°C/176°F). Melt chocolate, stirring gently until smooth. Remove from heat.
- Add flavor: Stir in 1 teaspoon vanilla extract and 1 tablespoon honey or golden syrup into the melted chocolate. Mix well.
- Assemble the bars: Spread the melted chocolate evenly over the chilled crust. Sprinkle the toasted almonds on top, pressing lightly into the chocolate.
- Chill again: Refrigerate the assembled bars for at least 2 hours, or until the chocolate is firm and set. For quicker setting, freeze for 30 minutes but avoid freezing for more than 1 hour to prevent cracking.
- Cut into squares: Use the parchment overhang as handles to lift the slab out of the pan. Cut into 12-16 bars with a sharp knife, wiping the blade between cuts for clean edges.
- Finish and serve: For a glossy finish, warm the knife slightly before slicing. Serve at room temperature for optimal texture.
After cutting, keep the bars refrigerated until ready to serve. Serve at room temperature for best texture, allowing the chocolate to soften slightly and release its aroma.
How to Know It’s Done
- Chocolate is shiny and melts smoothly when pressed with a spoon.
- Almonds are evenly toasted and fragrant, with no raw smell.
- Bars are firm and hold shape without cracking when cut.
Chocolate Almond Bars
Ingredients
Equipment
Method
- Preheat your oven to 180°C (350°F). Spread the almonds on a baking sheet and toast for about 8-10 minutes until fragrant and golden. Cool completely before chopping coarsely.
- In a bowl, combine the crushed graham crackers or digestive biscuits with the melted butter and sugar. Mix until the mixture looks like damp sand and holds together when pressed.
- Press the crust mixture evenly into the bottom of a lined 20cm square baking pan. Use the back of a spoon or your fingers to smooth it out firmly. Chill in the fridge for about 15 minutes to set.
- Break the dark chocolate into small pieces and set a heatproof bowl over a saucepan filled with simmering water. Melt the chocolate gently, stirring constantly until smooth and glossy. Remove from heat.
- Stir the vanilla extract and honey into the melted chocolate until well combined. The mixture should be shiny and smooth.
- Pour the chocolate evenly over the chilled crust, spreading it out with a spatula for a smooth, shiny surface. Sprinkle the toasted almonds on top, pressing them lightly into the chocolate layer.
- Refrigerate the assembled bars for at least 2 hours, or until the chocolate is fully set and firm. For quicker setting, you can freeze for about 30 minutes.
- Use a warm knife to carefully slice the bars into 12-16 pieces, wiping the blade clean between cuts for neat edges.
- Serve your chocolate almond bars at room temperature to enjoy the full contrast of crunchy almonds and smooth chocolate. Enjoy!
Pro tips for perfect bars
- Bolded mini-head: Toast almonds until fragrant and golden—this deepens their nutty aroma and adds a smoky note.
- Bolded mini-head: Melt chocolate gently over a double boiler—this prevents scorching and keeps it glossy and smooth.
- Bolded mini-head: Chill the crust and assembled bars thoroughly—this helps set the layers for clean cuts and neat servings.
- Bolded mini-head: Use a warm knife to slice—wiping between cuts ensures clean edges without smearing.
- Bolded mini-head: Sprinkle a pinch of sea salt on top—just before the chocolate sets to enhance flavor contrast.
- Bolded mini-head: Watch for a shiny, firm chocolate layer—this indicates proper tempering and perfect texture.
- Bolded mini-head: Spread the chocolate quickly and evenly—this prevents it from setting unevenly and creating gaps.
Common mistakes and how to fix them
- FORGOT to preheat the oven → Always preheat to ensure even toasting and baking.
- DUMPED the chocolate in all at once → Melt chocolate gradually, stirring constantly for smoothness.
- OVER-TORCHED the almonds → Toast until fragrant and golden, then cool completely to prevent bitterness.
- MISTOOK sticky caramel for the chocolate layer → Wait for the chocolate to set fully before cutting or serving.
Fast fixes for kitchen mishaps
- When chocolate seizes, splash in a teaspoon of hot milk to smooth it out.
- If almonds burn quickly, patch with fresh toasted almonds and reduce oven temperature.
- Over-soft bars? Shield with a quick chill in the freezer for 5 minutes to firm up.
- Dumped too much salt? Fix with a drizzle of honey or a sprinkle of extra chocolate to balance.
- When in doubt, pantry swap: use coconut flakes instead of almonds for a chewy crunch and tropical aroma.
Prep, store, and reheat tips
- You can toast the almonds a day ahead; keep them in an airtight container at room temperature for fresh aroma.
- Prepare the crust mixture and press it into the pan a few hours before baking; cover and refrigerate to prevent drying out.
- Chocolate layer can be melted and mixed with flavorings up to 2 days in advance, stored in a sealed jar or bowl in the fridge. Reheat gently to regain smoothness.
- Bars should be stored in an airtight container at room temperature for up to 3 days, or refrigerated for 5–7 days, which makes the chocolate firmer and intensifies the cocoa aroma.
- Reheat slices briefly in a warm oven (around 150°C/300°F for 5 minutes) or microwave in short bursts, watching for melty, glossy chocolate that’s not overheated.
Top questions about chocolate almond bars
1. What kind of chocolate should I use?
Use good quality dark chocolate with at least 70% cocoa for a rich, glossy finish. Cheaper chocolates may seize or look dull.
2. How do I toast almonds properly?
Toast almonds until golden and fragrant, about 8-10 minutes at 180°C (350°F). Cool completely before chopping or layering.
3. How long should I chill the bars?
Chill the bars in the fridge for at least 2 hours until the chocolate is firm and shiny. Let sit at room temp for best texture before slicing.
4. Can I make these dairy-free?
Replace butter with coconut oil for a dairy-free crust. Expect a slightly nuttier aroma and softer texture, but still delicious.
5. Can I use different sweeteners?
Yes, swap honey for maple syrup or agave nectar. Maple adds a smoky sweetness, while agave is milder and neutral in flavor.
6. How do I get clean slices?
Use a sharp knife warmed slightly before slicing to get clean cuts. Wipe the blade between cuts to keep edges neat.
7. What if my chocolate seizes?
If the chocolate seizes or becomes grainy, add a teaspoon of hot milk and stir until smooth. Keep heat gentle to avoid scorching.
8. How should I store these bars?
Store leftovers in an airtight container at room temp for up to 3 days, or in the fridge for 5–7 days. Reheat briefly for melty texture.
9. What if my almonds burn?
If almonds burn, quickly add a handful of fresh toasted almonds and lower oven temp for the next batch. Keep a close eye during toasting.
10. Can I substitute the almonds?
When in doubt, swap almonds for chopped hazelnuts or pecans for different crunch and flavor profiles. Keep an eye on toasting times.
These chocolate almond bars are more than just a treat; they’re a quiet reminder that simple ingredients, handled with patience, can turn into something unexpectedly special. The way the toasted almonds crackle against the smooth chocolate makes each bite feel like a small celebration of textures and flavors.
Whenever I make these bars, I think about how they bridge the chaos of everyday life with moments of quiet satisfaction. It’s a recipe that rewards attention to detail and a bit of patience, resulting in a snack that’s honest, comforting, and just a little bit indulgent. Sometimes, that’s exactly what a good dessert should do.

Hi, I’m Oliver Stone, the writer, cook, and storyteller behind Crying Into the Onions. I’m so glad you found your way here. This blog was born from equal parts humor, heart, and a deep love for honest cooking. I started this blog to share more than just recipes — I wanted to capture the emotions, memories, and quirks that make food more than fuel. Because sometimes, cooking makes you laugh. Sometimes, it makes you cry (into the onions, naturally). And most of all, it brings people together.

