
This brownie recipe is a bit of a kitchen experiment, using pantry staples in unexpected ways to add texture and depth. It’s about turning a simple, familiar treat into something that surprises your senses—crunchy edges, gooey centers, and a whisper of smoky salt that keeps you coming back for more.
I love how a handful of ingredients you already have can transform the classic brownie into a tiny adventure. It’s not about perfection; it’s about tasting the chaos, the pride in finding new textures, and the joy of making something comforting with a twist. Sometimes, that’s what we need—an extra layer of flavor, a little unpredictability in our baking.
Baking these brownies feels like a small rebellion—breaking the rules just enough to keep it interesting. They remind me that even the simplest recipes can be a playground for creativity, especially when you’re using what’s already in your kitchen. That moment when the smell hits the house—rich, chocolatey, with a hint of something smoky—makes all the mess worth it.
Focusing on how a simple, homemade brownie can be transformed by using unconventional, pantry-staple ingredients to create unexpected textures and flavors, making each batch a tiny adventure in the kitchen.
The story behind this recipe
- This recipe was born out of a lazy Sunday afternoon experiment. I had a craving for something rich and fudgy, but wanted to shake things up with a little unexpected crunch and depth. The idea of adding a pinch of smoked salt and using pantry staples like oats and coffee came from wanting to elevate the usual brownie and make it more interesting.
- Baking these brownies feels like a small rebellion—breaking the rules just enough to keep it interesting. They remind me that even the simplest recipes can be a playground for creativity, especially when you’re using what’s already in your kitchen. That moment when the smell hits the house—rich, chocolatey, with a hint of something smoky—makes all the mess worth it.
- The smell of melting chocolate, the crackle of oats toasting lightly in the oven, the surprise of a smoky salt crunch—these moments turned a simple treat into a little kitchen adventure.
Ingredient breakdown: key components
- Dark chocolate: I prefer a high cocoa percentage—gives that deep, slightly bitter punch. If you want it sweeter, add a touch more sugar.
- Butter: I stick with unsalted, but salted butter can add a subtle savory note—just cut back on the salt in the recipe.
- Eggs: Use large eggs for consistency. For extra richness, a splash of yolk works wonders—makes the brownie extra fudgy.
- Sugar: Brown sugar adds moisture and a hint of caramel—if you want a crisper crust, sprinkle a little extra on top before baking.
- Cocoa powder: Use natural, not Dutch-processed—brings out a more intense chocolate flavor and better rise.
- Oats: Rolled oats add crunch and texture—toast them lightly in the oven beforehand for a nuttier flavor.
- Salt: Just a pinch of flaky sea salt on top before baking enhances the chocolate’s richness—don’t skip it if you want that savory contrast.
Spotlight on key ingredients
Dark chocolate:
- I prefer a high cocoa percentage—gives that deep, slightly bitter punch. If you want it sweeter, add a touch more sugar.
- Butter: I stick with unsalted, but salted butter can add a subtle savory note—just cut back on the salt in the recipe.
- Cocoa powder: Use natural, not Dutch-processed—brings out a more intense chocolate flavor and better rise.
Oats:
- Rolled oats add crunch and texture—toast them lightly in the oven beforehand for a nuttier flavor.
- Salt: Just a pinch of flaky sea salt on top before baking enhances the chocolate’s richness—don’t skip it if you want that savory contrast.
Notes for ingredient swaps
- Dairy-Free: Swap butter for coconut oil or vegan butter. It might add a slight coconut flavor or a softer texture.
- Sugar Alternatives: Use honey or maple syrup instead of granulated sugar. Expect a moister brownie with a hint of caramel or maple flavor.
- Gluten-Free: Replace wheat flour with almond or oat flour. Oats add crunch, but almond flour keeps it fudgy and rich.
- Vegan: Use flax eggs (1 tbsp ground flaxseed + 3 tbsp water per egg). It works well but may slightly alter the crumb.
- Add-ins: Mix in chopped nuts, dried fruit, or chocolate chips. They bring extra crunch or bursts of sweetness—use what you love.
- Cocoa Powder: Switch to Dutch-processed for a milder, less acidic taste, or stick with natural for that deep, intense chocolate punch.
- Salt: Use flavored salts like smoked salt or fleur de sel. It amplifies the chocolate’s richness and adds a subtle surprise.
Equipment & Tools
- Oven: To bake the brownies evenly at the right temperature.
- 20cm (8-inch) square baking pan: To hold the batter and shape the brownies.
- Parchment paper: To prevent sticking and make removing the brownies easier.
- Heatproof bowl: To melt chocolate and butter safely over simmering water.
- Whisk: To combine eggs, sugar, and vanilla smoothly.
- Spatula: To fold ingredients and spread batter evenly.
- Toothpick: To test doneness in the center of the brownies.
- Wire rack: To cool the brownies evenly and prevent sogginess.
Step-by-step guide to brownies
- Preheat your oven to 175°C (350°F). Grease a 20cm (8-inch) square baking pan and line it with parchment paper for easy removal.
- Melt 200g dark chocolate and 115g unsalted butter together in a heatproof bowl over simmering water, stirring until smooth. Let it cool slightly, about 5 minutes.
- In a large bowl, whisk together 2 large eggs, 150g brown sugar, and 1 teaspoon vanilla extract until well combined and slightly frothy. This takes about 2 minutes of whisking.
- Pour the melted chocolate mixture into the egg mixture, stirring gently until fully incorporated. The batter will be thick and glossy.
- Sift in 50g cocoa powder and fold it in carefully, avoiding overmixing. Then stir in 100g rolled oats, a pinch of flaky sea salt, and any extras like chopped nuts or coffee grounds if desired.
- Pour the batter into the prepared pan, spreading it evenly. Smooth the top with a spatula. Bake for 25-30 minutes, or until the edges are set and a toothpick inserted in the center comes out with moist crumbs.
- During baking, you’ll notice the edges crack slightly and a rich chocolate aroma wafts through the kitchen. The top should form a slight crust but remain fudgy underneath.
- Let the brownies cool in the pan for about 15 minutes. Then, transfer to a wire rack and allow to cool completely before slicing. Resting helps set the texture and makes cutting cleaner.
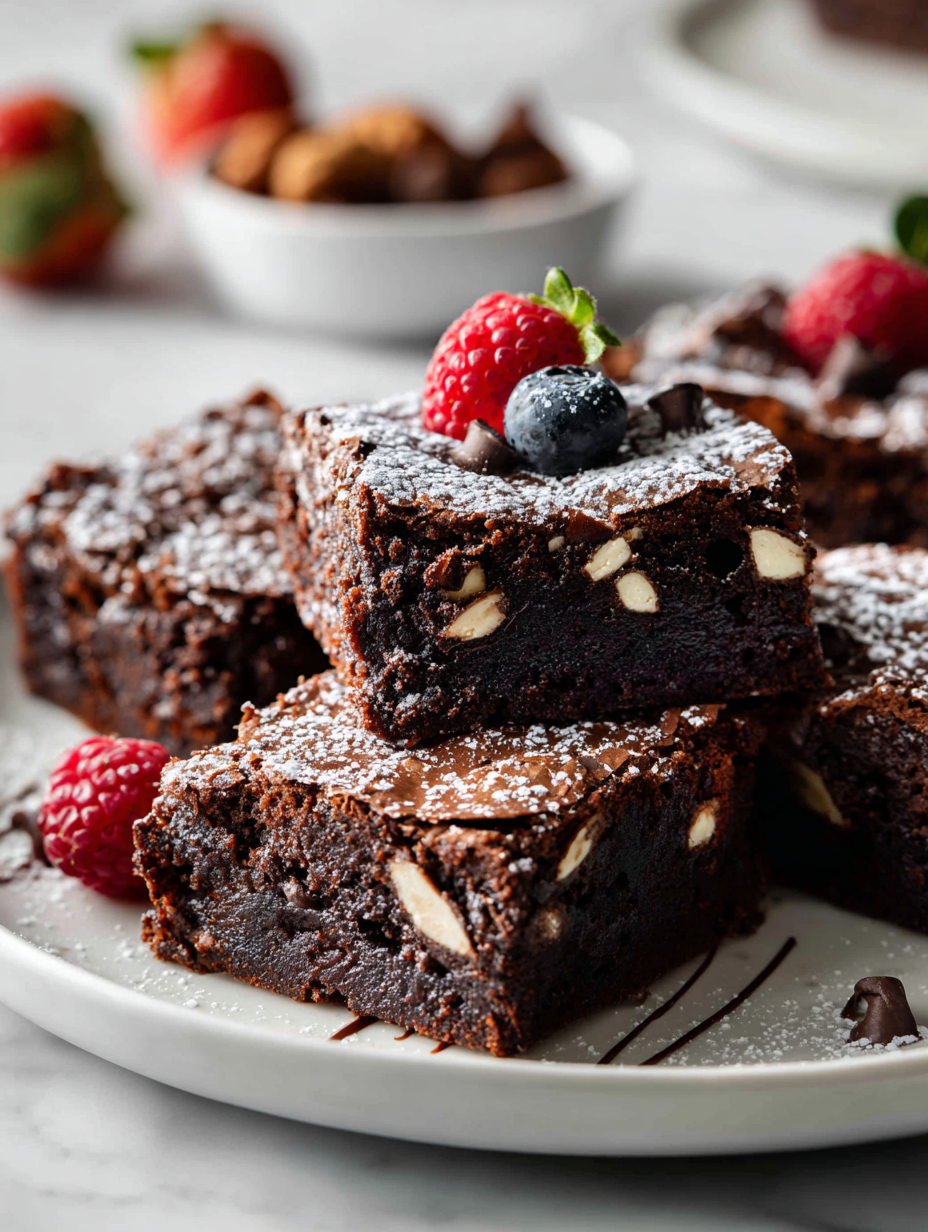
- Cut into squares with a sharp serrated knife. Serve slightly warm for gooey richness or chilled for firmer bites. The edges will be crisp, and the center intensely fudgy.
Allow the brownies to cool fully in the pan before slicing. For best texture, serve slightly warm or chilled, depending on your preference. Finish with a sprinkle of flaky sea salt or a dusting of cocoa powder for extra flair.
How to Know It’s Done
- Edges are slightly cracked and set, with a shiny top.
- Toothpick inserted in center comes out with moist crumbs, not wet batter.
- Smell is rich, chocolatey, with a hint of toasted oats and salt.
Pantry-Adventure Brownies
Ingredients
Equipment
Method
- Preheat your oven to 175°C (350°F). Line your baking pan with parchment paper, leaving some overhang for easy removal.
- Chop the dark chocolate into small pieces and melt it together with the butter in a heatproof bowl over simmering water, stirring until smooth and glossy. Let it cool slightly—this helps prevent cooking the eggs later.
- In a large bowl, whisk the eggs, brown sugar, and vanilla extract until the mixture becomes light, slightly frothy, and fragrant—about 2 minutes. This introduces air and enhances the richness.
- Pour the slightly cooled melted chocolate mixture into the egg mixture, gently folding until fully combined—your batter will turn glossy and thick.
- Sift the cocoa powder into the batter to prevent lumps, then fold it in carefully, maintaining the batter’s smoothness. Add the toasted oats and a pinch of flaky sea salt, folding until evenly distributed.
- Pour the batter into your prepared pan, spreading it evenly with a spatula. Tap the pan gently on the counter to release any trapped air bubbles and to settle the batter.
- Sprinkle a pinch of flaky sea salt on top, which will create a savory contrast as it bakes and enhances the chocolate flavor.
- Bake the brownies in the oven for about 25-30 minutes. The edges should be set and slightly cracked, and a toothpick inserted into the center will come out with moist crumbs—never wet batter.
- Remove the pan from the oven and let the brownies cool in the pan for 15 minutes. Then, transfer them to a wire rack and allow to cool completely—this helps the texture set and makes slicing easier.
- Once cooled, lift the brownies out of the pan using the parchment overhang, then slice into squares with a sharp serrated knife. Serve slightly warm for a gooey experience or chilled for a firmer bite.
- Enjoy your homemade pantry-styled brownies, marveling at the crunchy edges, fudgy centers, and the subtle smoky salt finish—each bite is a delightful surprise!
Notes
Pro tips for perfect brownies
- Use high-quality chocolate for a richer, more intense flavor. The better the chocolate, the better the brownie.
- Slightly underbake—edges should be set but center still gooey. It’s the secret to that fudgy texture.
- Tap the pan on the counter once out of the oven to release trapped air and settle the batter.
- For extra crunch, sprinkle coarse sea salt on top right before baking and listen for that crackle.
- Mix ingredients just until combined—overmixing can make brownies dense instead of tender.
- Cool the brownies in the pan on a wire rack for at least 15 minutes before slicing; this helps set the center.
- For cleaner slices, run a sharp knife under hot water between cuts—wipe it dry first.
Common mistakes and how to fix them
- FORGOT to check oven temperature → Use an oven thermometer for accuracy.
- DUMPED in all flour at once → Sift and fold gently to avoid dense brownies.
- OVER-TORCHED the edges → Cover with foil if edges brown too fast.
- MISSED the cooling step → Cool fully for cleaner slices and better texture.
Quick fixes and pantry swaps
- When the batter looks too thick, splash in a tablespoon of milk to loosen it.
- If brownies are drying out, patch with a thin layer of melted chocolate and bake 2 more minutes.
- Splash a little coffee or espresso powder into the batter for an intensified chocolate flavor.
- Shield the edges with foil if they turn dark too quickly during baking.
- DUMPED in too much salt? Rinse the top with a damp cloth and sprinkle fresh flaky salt after baking.
Prep, store, and reheat tips
- Prepare the batter up to a day in advance, cover tightly, and refrigerate for a more developed chocolate flavor.
- Brownies can be stored in an airtight container at room temperature for up to 3 days, keeping them soft and fudgy.
- For longer storage, freeze individually wrapped brownies for up to 3 months; thaw at room temperature for best texture.
- Reheat slices briefly in the microwave (about 10 seconds) until warm and gooey, watching for melting chocolate and soft edges.
- Freshly reheated brownies will have a richer aroma and a slightly softer texture, perfect for that just-baked feel.
Top questions about brownies
1. Should I add salt to my brownies?
Yes, adding a pinch of salt enhances the chocolate flavor and balances sweetness. It’s small but mighty.
2. Can I use cold butter instead of melted?
Using melted butter makes the batter richer and easier to mix. Cold butter works fine if you melt it first.
3. How do I prevent dense brownies?
Overmixing can make brownies dense. Mix just until the flour disappears for a tender crumb.
4. Should I cool brownies before cutting?
Cooling in the pan helps set the structure. Let them sit for at least 15 minutes before slicing.
5. What kind of chocolate is best?
Use high-quality dark chocolate for a deep, intense flavor. Cheaper chocolates may turn out flat.
6. What oven temperature and time are ideal?
Baking at 350°F (175°C) for about 25-30 minutes works well. Check with a toothpick for doneness.
7. How long do brownies stay fresh?
Brownies stored in an airtight container stay soft for 2-3 days. For longer, freeze them wrapped tightly.
8. What if my edges burn while baking?
If the edges brown too quickly, loosely cover with foil to prevent burning while the center finishes baking.
9. Can I add coffee or flavorings?
Adding a teaspoon of espresso powder intensifies the chocolate flavor without making the brownies taste coffee.
10. Can I make this vegan or dairy-free?
Yes, you can substitute coconut oil, vegan butter, or applesauce. Expect slight changes in texture and flavor.
Baking these brownies feels like a quiet rebellion—using pantry staples to turn something simple into a small kitchen adventure. Each bite offers a rich, fudgy center with just enough crunch and a whisper of smoky salt that keeps you coming back.
They remind me that even the most familiar treats can surprise you when you play a little, trust your instincts, and embrace a bit of chaos in the process. Sometimes, that’s exactly what we need—something comforting but with a twist, right from our own kitchen.
Hey there — I’m Olivia “Liv” Carter, founder, recipe crafter, and storyteller behind Crying Into The Onions. I live somewhere in the heartland of the United States, where seasons change boldly, the smell of onions sizzling in a pan is a love language, and the kitchen is my favorite place to get messy and find magic.
I started this blog to share more than just recipes — I wanted to capture the emotions, memories, and quirks that make food more than fuel. Because sometimes, cooking makes you laugh. Sometimes, it makes you cry (into the onions, naturally). And most of all, it brings people together.