There’s something quietly mesmerizing about a marble pound cake. The way the chocolate and vanilla swirl together, each slice revealing a tiny mosaic of contrasting textures and flavors, makes it feel like baking meets art. I love that it’s simple enough for a weekend project but impressive enough to serve to friends without explanation.
This cake isn’t just about looks, though. It’s about the tactile experience—the slight crunch of the crust giving way to a dense, moist crumb that’s both rich and tender. The swirl pattern isn’t just decoration; it’s a reminder that baking can be playful and visually satisfying, turning a humble pound cake into a conversation piece. It’s a perfect blend of comfort and surprise, something I keep coming back to when I want to indulge a little differently.
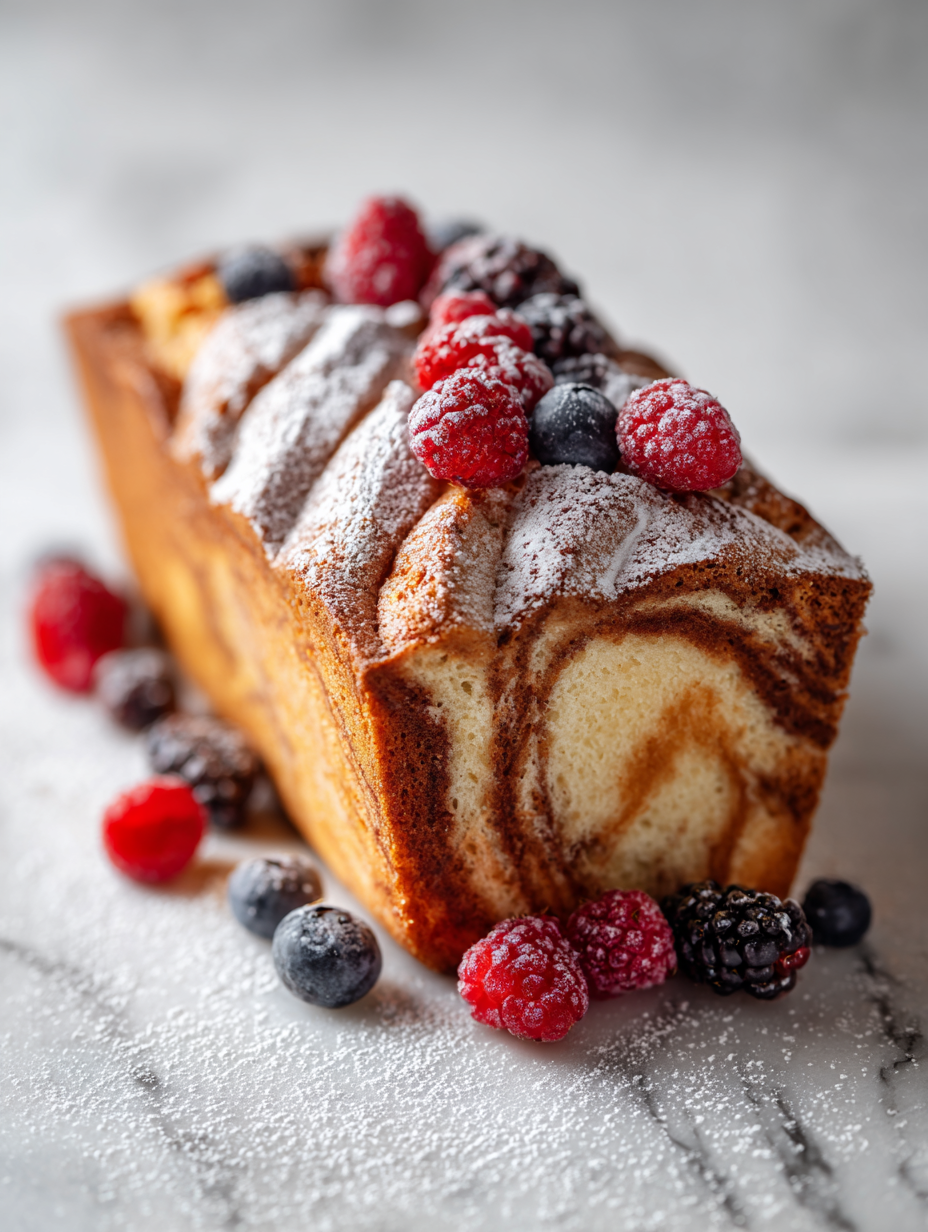
Focusing on the visual and textural contrast of marbled pound cake, this recipe explores how the swirl pattern becomes a storytelling element—each slice revealing a mosaic of chocolate and vanilla layers. It’s about the joy of creating a dessert that’s as much a feast for the eyes as it is for the palate, turning a simple pound cake into an edible piece of art that sparks conversations and nostalgia at the table.
The Art of Visual Contrast
- Baking this cake feels like a quiet act of rebellion—something so simple yet so visually striking.
- I still get excited watching the chocolate swirl merge into vanilla—like a tiny, edible magic trick.
- Sharing slices of this marble beauty always sparks nostalgia—reminds me of childhood weekends at grandma’s.
- There’s a pride in seeing that perfect swirl pattern emerge—like I’ve created a little piece of art.
- This cake is my fallback for when I want to impress without fuss—familiar, gorgeous, and surprisingly forgiving.
The story behind this recipe
- Baking this marble pound cake always takes me back to my grandmother’s kitchen, where the air was thick with the scent of vanilla and cocoa. I loved watching her swirl the chocolate into the batter, turning simple ingredients into a living piece of art. It’s a recipe I keep returning to, not just for the taste but for those moments of quiet, messy joy in the kitchen.
- Every time I make it, I feel a little like an artist—carefully creating a visual contrast that’s as satisfying to see as it is to eat. The process of swirling, watching the dark and light mix into a marbled tapestry, feels almost meditative. It’s a reminder that baking is both a craft and a quiet celebration of contrasts—flavor, texture, and appearance all wrapped into one.
- heading: ‘The art of visual contrast’
Contextual origin, trivia, or history
- The marbled effect in pound cake dates back to early 20th-century European baking, where visual appeal was as important as flavor.
- Chocolate and vanilla swirl patterns became popular in American kitchens during the 1950s, symbolizing post-war optimism and creativity.
- This cake’s design is reminiscent of traditional marble sculptures, which inspired bakers to mimic that intricate veining in desserts.
- In some cultures, marbled confections were believed to bring good luck, making the cake a festive centerpiece for celebrations.
Ingredient breakdown: key components
- Unsalted butter: I use high-quality butter for richness—makes the cake feel luxurious and melts smoothly into the batter. You can swap in margarine, but the flavor will be less deep.
- Granulated sugar: I prefer superfine for a more tender crumb, but regular works. Just watch for overmixing, or it can become grainy.
- Eggs: Fresh eggs give the cake structure and moisture—avoid older eggs that might make the batter look dull or thin during mixing.
- All-purpose flour: I sift mine to prevent lumps and ensure a fine crumb. You can try cake flour for a softer texture, but all-purpose keeps it sturdy enough for the swirl pattern.
- Cocoa powder: I love using a good Dutch-processed cocoa—brighter flavor with less bitterness. For a more intense chocolate, go for natural cocoa, but adjust sugar accordingly.
- Vanilla extract: I always go for pure vanilla to deepen the overall aroma—less fake, more warm, sweet notes. You can experiment with almond extract for a different nuance.
- Chocolate: I melt good quality dark chocolate until silky—watch out for burning. For a different swirl, try white chocolate, but keep the vanilla in mind for flavor balance.
Spotlight on key ingredients
Butter:
- I use high-quality, European-style butter for a richer, melt-in-your-mouth crumb. It’s the backbone of that tender, moist texture.
- Vanilla extract: Pure vanilla brings warmth and depth—almost like a whisper of nostalgia in every bite. Skip the imitation for best flavor.
Cocoa powder and Eggs:
- Cocoa powder: Dutch-processed cocoa gives a smooth, mellow chocolate flavor with a velvety finish. It’s the visual punch for the marbling effect.
- Eggs: Fresh, large eggs ensure the batter emulsifies well, helping the swirl hold its shape while baking—plus, they add richness and lift.
Notes for ingredient swaps
- Dairy-Free: Swap unsalted butter for coconut oil or vegan butter. The flavor stays rich, but it might be a tad lighter in texture.
- Sugar Alternatives: Use honey or maple syrup in place of granulated sugar. Expect a slightly moister crumb and a hint of caramel flavor.
- Egg-Free: Replace eggs with mashed banana or apple sauce. The cake will be denser and slightly sweet, with a different crumb.
- Flour Variations: Try using almond flour or gluten-free blend. The texture may be more tender or crumbly, so adjust liquids accordingly.
- Cocoa Powder: Use natural cocoa for a brighter, more bitter chocolate note, or swap with carob powder for a milder, sweeter flavor.
- Milk: Substitute with almond milk, oat milk, or coconut milk. The flavor might shift slightly, especially with coconut or oat, adding subtle notes.
- Chocolate: Opt for white chocolate or milk chocolate chunks for a different swirl effect and flavor profile.
Equipment & Tools
- 9×5-inch loaf pan: Holds the batter during baking, maintains shape
- Mixing bowls: Combine ingredients separately and for layering
- Electric mixer or whisk: Cream butter and sugar, beat eggs, mix ingredients smoothly
- Spatula or spoon: Fold ingredients, swirl batters
- Toothpick or skewer: Create marbled swirl pattern
- Cooling rack: Allow cake to cool evenly without steam buildup
- Parchment paper: Eases removal from pan
Step-by-step guide to marble pound cake
- Preheat your oven to 175°C (350°F). Grease a 9×5-inch loaf pan and line it with parchment paper for easy removal.
- In a large bowl, cream 1 cup (225g) of unsalted butter and 1 1/2 cups (300g) of sugar until pale and fluffy, about 3-4 minutes. Use a hand or stand mixer on medium speed.
- Add 4 large eggs, one at a time, beating well after each addition. Scrape down the sides of the bowl to keep everything combined smoothly.
- Mix in 2 teaspoons of vanilla extract. This adds warmth and depth to the overall flavor.
- In a separate bowl, sift together 2 1/2 cups (310g) of all-purpose flour, 1 teaspoon baking powder, and a pinch of salt.
- Gradually add the dry ingredients to the butter mixture, mixing on low speed. Alternate with 1/2 cup (120ml) of whole milk, beginning and ending with the flour. Mix just until combined; do not overmix to keep the crumb tender.
- Divide the batter evenly into two bowls. To one, add 1/4 cup (25g) of Dutch-processed cocoa powder and mix until smooth. This becomes your chocolate layer.
- To assemble, pour the vanilla batter into the prepared loaf pan, spreading it evenly. Then, dollop the chocolate batter on top and gently swirl with a skewer or toothpick to create a marbled effect—don’t overdo it, aim for a ribboned pattern.
- Bake in the preheated oven for 55-60 minutes. The top should be golden, and a toothpick inserted into the center should come out with moist crumbs, not wet batter.
- If the top browns too quickly—cover loosely with foil around 45 minutes. This prevents over-torching while the center finishes baking.
- Once baked, remove from the oven and place on a wire rack. Let the cake cool in the pan for 15 minutes, then lift out using the parchment paper and transfer to cool completely—about 1 hour.
- Rest the cake at room temperature before slicing to allow the crumb to set properly. Slice with a serrated knife, revealing the marbled pattern.
Allow the cake to cool completely on a rack before slicing. Resting helps the crumb set and prevents crumbling. Slice with a serrated knife for clean edges, revealing the marbled pattern. Serve at room temperature to enjoy the full aroma and tender crumb.
How to Know It’s Done
- The crust is golden and slightly crackled, with a fragrant vanilla-cocoa aroma.
- The top feels firm but springy when lightly pressed, indicating the center is cooked.
- A toothpick inserted in the middle comes out with moist crumbs, not raw batter.
Marble Pound Cake
Ingredients
Equipment
Method
- Preheat your oven to 175°C (350°F). Grease your loaf pan and line it with parchment paper for easy removal.
- Using a mixer or whisk, cream the softened butter and sugar together on medium speed until the mixture is pale, fluffy, and fragrant—about 3-4 minutes. You’ll notice it lightens in color and feels smooth and slightly thickened.
- Add the eggs one at a time, beating well after each addition. The batter should become smooth and glossy, with a slightly thickened texture as the eggs incorporate fully.
- Stir in the vanilla extract, letting the aroma fill your kitchen as the mixture turns fragrant and creamy.
- In a separate bowl, sift together the flour and baking powder to ensure an even, lump-free mixture. Gradually add this dry mixture to the wet batter on low speed, alternating with the milk. Mix just until the ingredients are combined—don’t overmix, or the batter could become dense.
- Divide the batter evenly into two bowls. To one, gently fold in the cocoa powder until smooth, creating a rich chocolate batter.
- Pour the vanilla batter into your prepared loaf pan, spreading it evenly. Then, dollop the chocolate batter on top in spoonfuls.
- Using a skewer or toothpick, gently swirl the chocolate and vanilla layers together. Make slow, figure-eight motions to create a beautiful marbled pattern—avoid overmixing to keep the distinct swirls intact.
- Bake for approximately 55-60 minutes, until the top is golden and a toothpick inserted into the center comes out moist with crumbs. If the crust browns too quickly, loosely cover with foil around the 45-minute mark.
- Remove the cake from the oven and let it cool in the pan for 15 minutes. Then, transfer it to a wire rack and cool completely—about 1 hour—until the crumb feels set and the pattern is clear.
- Slice the cooled cake with a serrated knife, revealing the marbled pattern inside. Serve at room temperature and enjoy the moist, tender crumb with its stunning visual contrast.
Top tips for perfect marble cake
- Bolded mini-head: Use a toothpick or skewer to swirl the batters gently—less is more to keep the marbling defined.
- Bolded mini-head: Ensure ingredients are at room temperature before mixing—this helps create a smooth, glossy batter that swirls easily.
- Bolded mini-head: When layering batters, dollop them randomly—this creates a more natural, artistic marbled effect.
- Bolded mini-head: Don’t overmix after adding the cocoa—stir just until the swirl pattern is visible, to avoid blending the colors too much.
- Bolded mini-head: Keep an eye on the oven’s heat—if the crust darkens too fast, cover loosely with foil to prevent burning.
- Bolded mini-head: Let the cake cool completely before slicing—this helps the marbled pattern stay sharp and prevents crumbling.
- Bolded mini-head: Use a serrated knife to cut—saw gently to reveal the intricate swirl without squashing the pattern.
Common marble cake mistakes and fixes
- FORGOT to preheat oven → Always preheat to ensure even baking and proper rise.
- DUMPED in all ingredients at once → Mix ingredients gradually for a smooth batter and swirl clarity.
- OVER-TORCHED crust → Cover with foil if top darkens too quickly, avoid bitterness.
- UNDER-mixed batter → Mix until just combined to prevent dense, uneven texture.
Quick fixes for marble cake mishaps
- If batter is too thick, splash in a tablespoon of milk and stir gently.
- When swirl pattern blurs, patch with a toothpick and a gentle swirl to restore definition.
- Splash a few drops of vanilla or coffee extract if cake lacks depth or aroma.
- If the crust over-browns, shield with foil for a quick 5-second rescue, preserving moisture.
- Pan stuck or crumbly? Swap parchment paper with buttered foil for a cleaner release.
Prep, store, and reheat tips
- Prepare the batter up to the point of swirling; refrigerate for up to 24 hours. The flavors meld, and it’s ready to bake when you are.
- Wrap cooled cake tightly in plastic wrap or store in an airtight container. It keeps well at room temperature for 2 days, or in the fridge for up to a week—note that refrigeration softens the crust slightly.
- For longer storage, freeze slices in an airtight container or freezer bag for up to 3 months. Thaw at room temperature until just soft, then enjoy the same vibrant swirl and moist crumb.
- Reheat slices briefly in a 150°C (300°F) oven for 5-8 minutes. The aroma will shimmer back, and the crust crisps slightly, like fresh from the oven. Avoid microwaving if you want to preserve the texture.
Top questions about marble pound cake
1. Can I use natural cocoa instead of Dutch-processed?
Use high-quality dark or Dutch-processed cocoa for a richer, less bitter swirl. It makes a noticeable difference in color and flavor.
2. How do I know when the cake is done?
Bake until a toothpick inserted in the center comes out with moist crumbs, about 55-60 minutes. The top should be golden and slightly crackled.
3. Should I refrigerate the cake after baking?
Let the cake cool completely on a wire rack to set the crumb and make slicing easier without crumbling.
4. How long can I store the marble pound cake?
Yes, you can refrigerate slices wrapped tightly for up to a week. To reheat, warm briefly in a low oven for best texture.
5. How do I get a defined marble swirl?
Swirl gently with a skewer or toothpick, aiming for a natural pattern. Overmixing can blend the colors too much, losing the marble effect.
6. Should ingredients be cold or at room temperature?
Use room temperature ingredients for a smooth, glossy batter that swirls easily and bakes evenly.
7. What if the crust burns before the middle is baked?
If the crust darkens too fast, loosely cover with foil. This prevents over-browning while the center finishes baking.
8. How should I slice the cake for best presentation?
Use a serrated knife to gently saw through the cake for clean slices that show off the swirl pattern.
9. Can I make a larger or double batch of this cake?
Yes, you can double the recipe; just ensure your pan is large enough and adjust baking time slightly.
10. Can I add other flavors to this cake?
Yes, adding a teaspoon of espresso powder enhances the chocolate flavor without overpowering the vanilla.
This marble pound cake isn’t just a pretty face; it’s a quiet celebration of contrasts—flavor, texture, and visual. Each slice reveals that mesmerizing swirl, a little piece of art you get to eat. It’s a reminder that baking can be simple, playful, and deeply satisfying all at once.
Right now, when so many of us crave comforting, familiar flavors with a twist, this cake fits right in. A dense crumb with a glossy swirl—perfect for sharing or keeping all to yourself. It’s one of those recipes that feels like a small, sweet rebellion in the best way.

Hi, I’m Oliver Stone, the writer, cook, and storyteller behind Crying Into the Onions. I’m so glad you found your way here. This blog was born from equal parts humor, heart, and a deep love for honest cooking. I started this blog to share more than just recipes — I wanted to capture the emotions, memories, and quirks that make food more than fuel. Because sometimes, cooking makes you laugh. Sometimes, it makes you cry (into the onions, naturally). And most of all, it brings people together.

