Shortbread cookies might seem straightforward, but the magic is in how their texture shifts with different baking conditions. It’s not just about the ingredients, but how you handle the dough and the oven’s quirks that make all the difference. I’ve spent years chasing that perfect melt-in-your-mouth crumb that dissolves without feeling greasy or crumbly.
Baking these cookies is a bit of an experiment every time—adjusting resting times, oven racks, even the humidity in the room. That delicate balance is what makes each batch feel personal, a tiny victory or lesson. And honest, there’s a real joy in understanding how a minute more in the oven can turn a delicate crumb into something sturdier or meltier.
This recipe is my way of sharing that quiet, small-scale magic—how a simple butter and flour mix, treated just right, can evoke a nostalgic rush of buttery, slightly salty sweetness that feels like a warm memory.
Focusing on how the texture of shortbread evolves through different baking conditions, this recipe explores the subtle art of achieving the perfect crumb and melt-in-your-mouth quality, emphasizing the importance of oven nuances and resting times for optimal results.
The story behind this recipe
- This recipe started as a way to reclaim my childhood memories of my grandmother’s kitchen, where she’d pull out a tin of buttery cookies that disappeared in minutes. The simple elegance of shortbread has a way of anchoring me back to those quiet, cozy afternoons. I’ve tweaked and played with the ingredients over the years, trying to get that perfect crumb that’s both melt-in-your-mouth and just a little crumbly in the right way.
- Baking these isn’t just about the end result but the process—the feel of the dough, the smell of butter filling the kitchen, and watching the edges turn a faint golden hue. Each batch feels like a little act of meditation, a reminder that sometimes the simplest things are worth the patience. They’re a humble treat, but one that carries a lot of quiet, sweet memories.
- heading
- story_type
Key ingredients and tips
- Unsalted butter: I use high-quality European butter for that rich, clean flavor that melts smoothly. If you only have salted, reduce the added salt slightly.
- Powdered sugar: I prefer it for the fine, silky texture it gives—skip granulated sugar here or the cookies might feel gritty and coarse.
- All-purpose flour: I sift mine to avoid lumps and ensure a tender crumb. For a sturdier cookie, you could try half whole wheat, but it’ll change the texture.
- Salt: Just a pinch enhances the overall flavor without making it salty—don’t skip it, or the cookies can taste flat.
- Vanilla extract: I love a splash for that warm aroma, but a hint of almond extract can add a lovely nutty note if you’re feeling adventurous.
- Optional: A touch of cornstarch—just a teaspoon—can make the cookies extra tender and crumbly, almost melt-in-your-mouth.
- Chill time: I rest the dough in the fridge for at least 30 minutes; it firms up the butter, making the cookies easier to shape and bake evenly.
Spotlight on key ingredients
Unsalted Butter:
- I use high-quality European butter for that rich, clean flavor that melts smoothly. If you only have salted, reduce the added salt slightly.
- Powdered sugar: I prefer it for the fine, silky texture it gives—skip granulated sugar here or the cookies might feel gritty and coarse.
- All-purpose flour: I sift mine to avoid lumps and ensure a tender crumb. For a sturdier cookie, you could try half whole wheat, but it’ll change the texture.
Salt & Vanilla Extract:
- Salt: Just a pinch enhances the overall flavor without making it salty—don’t skip it, or the cookies can taste flat.
- Vanilla extract: I love a splash for that warm aroma, but a hint of almond extract can add a lovely nutty note if you’re feeling adventurous.
Notes for ingredient swaps
- Dairy-Free: Swap butter for coconut oil or vegan margarine. Expect a slightly different mouthfeel, less melt-in-your-mouth, but still buttery in aroma.
- Gluten-Free: Use almond flour or a gluten-free flour blend. Cookies may be a bit more fragile but keep that tender crumb.
- Sugar Alternatives: Replace powdered sugar with maple sugar or coconut sugar. The texture remains fine, but flavor shifts slightly earthy or caramel-like.
- Flavor Variations: Add lemon zest or lavender to the dough for a fresh aroma. These brighten the taste without much fuss.
- Salt: Use sea salt or flaky salt for a more pronounced salty crunch, especially if you like that contrast.
- Add-ins: Mix in chopped nuts or chocolate chips—just reduce the flour slightly to compensate for added weight.
- Chill Time: If in a hurry, refrigerate the dough for at least 15 minutes — still helps with shape and texture, just less time for butter to firm up.
Equipment & Tools
- Mixing bowl: Combine and cream ingredients smoothly.
- Electric mixer or whisk: Cream butter and sugar evenly.
- Sifter: Aerate flour and optional ingredients for lightness.
- Rolling pin: Roll out dough evenly.
- Cookie cutters: Shape cookies uniformly.
- Baking sheet: Bake cookies on a stable, heat-conductive surface.
- Parchment paper: Prevent sticking and promote even baking.
- Cooling rack: Cool cookies and prevent sogginess.
Step-by-step guide to shortbread
- Gather all your ingredients: butter, powdered sugar, flour, salt, vanilla. Chill the butter if it’s soft but not melted, about 10 minutes in the fridge if needed.
- In a mixing bowl, cream the butter and powdered sugar until smooth and slightly fluffy, about 2-3 minutes on low speed. The mixture should smell sweet and buttery.
- Add vanilla and salt to the creamed mixture. Mix briefly to combine. If using, sift in the flour and optional cornstarch, then gently fold until just incorporated. The dough will be crumbly but should hold together when pressed.
- Turn the dough onto a lightly floured surface. Knead gently a few times until it forms a cohesive ball. Flatten into a thick disc, about 2 inches high.
- Wrap the disc tightly in plastic wrap. Refrigerate for at least 30 minutes, or up to 2 hours. The dough should feel firm and cold to the touch after resting.
- Preheat your oven to 160°C (320°F). Line a baking sheet with parchment paper. Remove the dough from fridge, unwrap, and place on a floured surface.
- Roll the dough to about 0.5 cm (1/4 inch) thick. Cut into shapes with a cookie cutter or knife. Transfer to the prepared baking sheet, spacing about 1 inch apart.
- Bake for 12-15 minutes, until the edges are just beginning to turn golden. They should smell buttery and faintly sweet.
- Remove from oven and let cookies sit on the baking sheet for 5 minutes. Then transfer to a wire rack to cool completely. They’ll firm up as they cool, with a delicate melt-in-your-mouth texture.
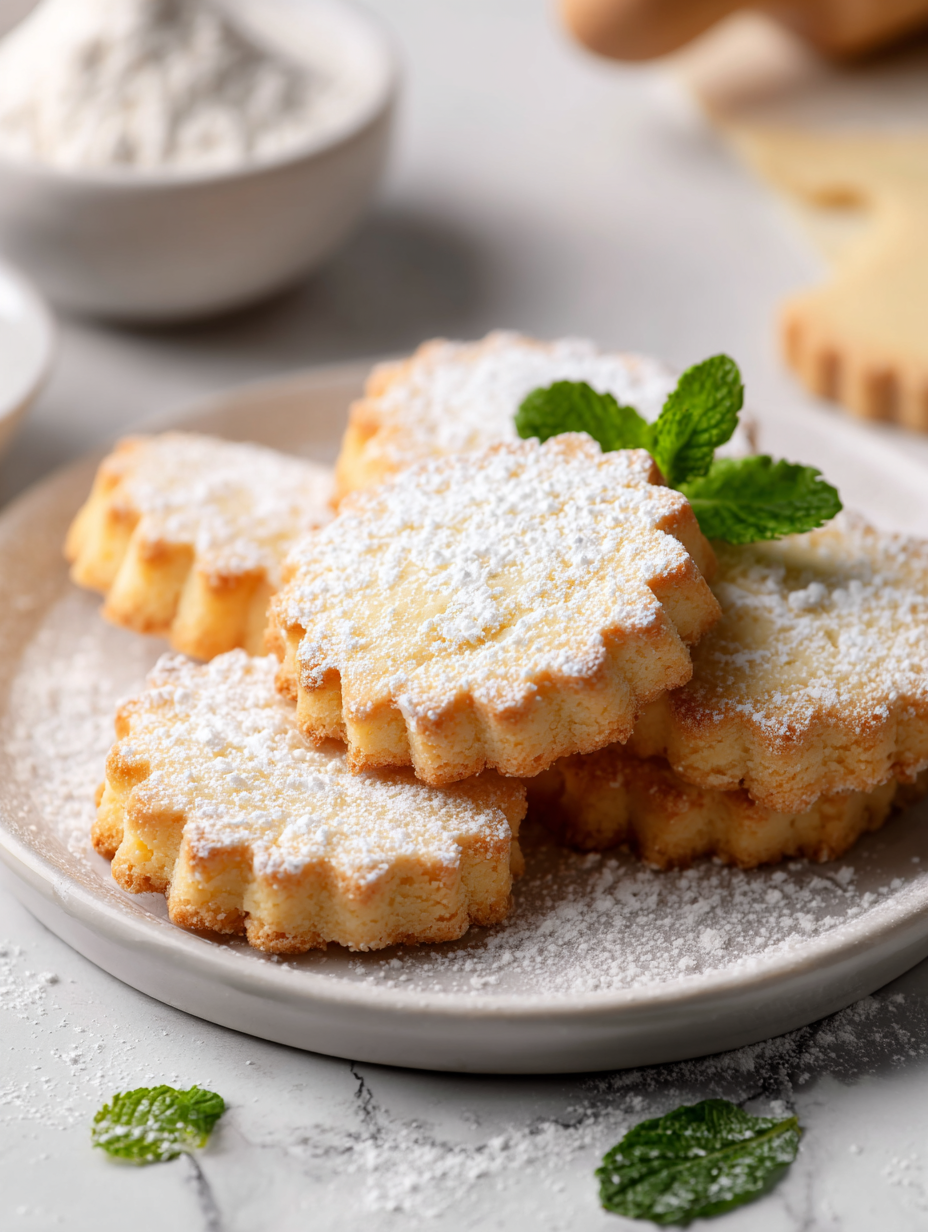
- Once cooled, dust with a light sprinkle of powdered sugar if you like. Serve with a cup of tea or coffee. The cookies should be crisp on the edges and tender in the center.
Rest the dough in the fridge for at least 30 minutes to firm up. After baking, cool on a wire rack until completely crisp. Dust with powdered sugar if desired, then serve or store.
How to Know It’s Done
- Edges are lightly golden and cookies feel firm but tender when touched.
- Cookies smell buttery with a hint of vanilla as they bake.
- They crack slightly at the edges and have a melt-in-your-mouth crumb when bitten.
Classic Shortbread Cookies
Ingredients
Equipment
Method
- In a mixing bowl, combine the chilled butter and sifted powdered sugar. Use an electric mixer or whisk to beat them together on low speed until smooth and creamy, about 2-3 minutes. The mixture will smell sweet and buttery.
- Add the vanilla extract and salt to the creamed mixture, then briefly mix to incorporate. Sift the flour into the bowl, then gently fold or mix until just combined. The dough will be crumbly but should hold together when pressed.
- Turn the dough out onto a lightly floured surface. Knead gently a few times until it forms a cohesive ball. Flatten the dough into a disc about 2 inches thick, then wrap tightly in plastic wrap.
- Refrigerate the wrapped dough for at least 30 minutes to firm up the butter and make it easier to roll out. The dough should feel cold and firm after resting.
- Preheat your oven to 160°C (320°F). Line a baking sheet with parchment paper. Remove the dough from the fridge, unwrap, and place on a lightly floured surface. Use a rolling pin to roll out the dough to about 0.5 cm (1/4 inch) thickness.
- Use cookie cutters or a knife to cut the dough into your desired shapes. Carefully transfer the cut cookies onto the prepared baking sheet, spacing them about 1 inch apart.
- Bake in the preheated oven for 12-15 minutes, until the edges are just beginning to turn golden and the cookies smell buttery and sweet.
- Remove the cookies from the oven and let them sit on the baking sheet for 5 minutes. Then, transfer them to a wire rack to cool completely. They will firm up and develop a delicate, melt-in-your-mouth texture.
- Once cooled, you can dust the cookies lightly with powdered sugar for an elegant touch. Serve with tea or coffee and enjoy their tender, buttery crumb.
Notes
Pro tips for perfect shortbread
- Bolded mini-head: Chill the dough thoroughly to prevent spreading and to enhance flavor development.
- Bolded mini-head: Use a light touch when mixing to keep the dough tender and crumbly rather than tough.
- Bolded mini-head: Keep the oven just below your usual baking temp to get that delicate, melt-in-your-mouth texture.
- Bolded mini-head: Score the dough before baking for clean, even slices afterward; don’t cut straight from the oven.
- Bolded mini-head: Rotate the baking sheet halfway through to ensure even browning and a consistent color.
- Bolded mini-head: Allow cookies to cool completely on a rack to firm up their texture and prevent sogginess.
- Bolded mini-head: Dust with powdered sugar while cookies are slightly warm for a smooth, shiny finish.
Common mistakes and how to fix them
- FORGOT to measure butter accurately? Use a scale for precise texture.
- DUMPED in too much flour? Lighten the dough with a gentle fold, don’t overmix.
- OVER-TORCHED cookies? Lower oven temp slightly and keep an eye on the edges.
- MISSED resting time? Chill longer for a more manageable dough and better crumb.
Quick fixes and pantry swaps
- When cookies spread too much, chill the dough for 15 minutes before baking.
- Splash a few drops of water on the edges if they over-brown quickly.
- Patch cracked cookies with a tiny dab of dough and smooth out the surface.
- DUMPED in too much flour? Brighten the dough with a gentle knead, don’t overmix.
- When the dough feels crumbly, add a teaspoon of cold water to bring it together.
Prep, store, and reheat tips
- Dough can be prepared up to 2 days ahead; wrap tightly and keep chilled for a firm, manageable texture.
- Cookies can be stored in an airtight container at room temperature for up to a week, maintaining their crisp edges.
- For longer storage, freeze baked cookies for up to 3 months; thaw at room temperature for optimal freshness.
- Reheat cookies briefly in a low oven (about 150°C/300°F) for 5 minutes until just warm and slightly crisp again, with a subtle buttery aroma filling the room.
Top questions about shortbread cookies
1. Should I use softened or cold butter?
Use cold, high-quality butter for the best melt-in-your-mouth feel. Warm butter can make the dough greasy and spread too much.
2. Can I make these gluten-free?
Yes, you can substitute gluten-free flour, but the texture may be a bit more crumbly and delicate.
3. How long should I chill the dough?
Chill the dough at least 30 minutes; this firms up the butter and makes rolling easier, preventing spreading.
4. How do I know when they’re done?
Bake until the edges are faintly golden, about 12-15 minutes. They should smell buttery and sweet, not burnt.
5. Can I use regular sugar instead of powdered?
Powdered sugar gives a silky texture and delicate sweetness. Granulated sugar might make the cookies gritty and coarse.
6. How should I store leftover cookies?
Store in an airtight container at room temp for up to a week or freeze for longer. Reheat briefly for crispness.
7. Can I add flavors or mix-ins?
Add a teaspoon of lemon zest or lavender for a fragrant twist. Just a small amount enhances flavor without overpowering.
8. What if I over-bake them?
Over-baking leads to tough, dry cookies. Keep an eye on the edges and take them out just as they turn faintly golden.
9. How do I avoid overworking the dough?
Use a light touch when mixing to keep the dough tender. Overworking can develop gluten and toughen the cookies.
10. Why do my cookies spread too much?
If cookies spread unevenly, chill the dough longer or ensure your oven temperature is accurate. Use an oven thermometer.
Baking these shortbread cookies is a quiet act of patience that rewards with that perfect melt-in-your-mouth crumb. Each batch feels like a small victory, especially when the buttery aroma fills your kitchen. In a world of fleeting trends, these cookies are a simple, honest pleasure that remind me of cozy afternoons and warm memories.
They’re the kind of treat that feels timeless, yet special every time you make them. Whether for a quick snack or a thoughtful gift, their delicate texture and buttery flavor never fail to bring a little calm and comfort. Sometimes, the simplest things really do matter most.

Hi, I’m Oliver Stone, the writer, cook, and storyteller behind Crying Into the Onions. I’m so glad you found your way here. This blog was born from equal parts humor, heart, and a deep love for honest cooking. I started this blog to share more than just recipes — I wanted to capture the emotions, memories, and quirks that make food more than fuel. Because sometimes, cooking makes you laugh. Sometimes, it makes you cry (into the onions, naturally). And most of all, it brings people together.

