These savory vegetable muffins are my go-to for turning leftover odds and ends into something worth waking up for. There’s a kind of magic in chopping up a handful of carrots, zucchini, and spinach, and tossing them into a batter that bakes up golden and crispy around the edges. It’s like giving new life to what’s been sitting forgotten in the fridge, transforming it into a snack or breakfast that feels like a little reward.
I love how forgiving this recipe is—no need for perfect cuts or precise measurements. Just rough chop what you have, mix it into a batter with a few pantry staples, and bake. The smell of those muffins baking—warm, cheesy, with a hint of roasted vegetables—always pulls someone into the kitchen. It’s honest, simple comfort, with a little bit of a kitchen win every time.
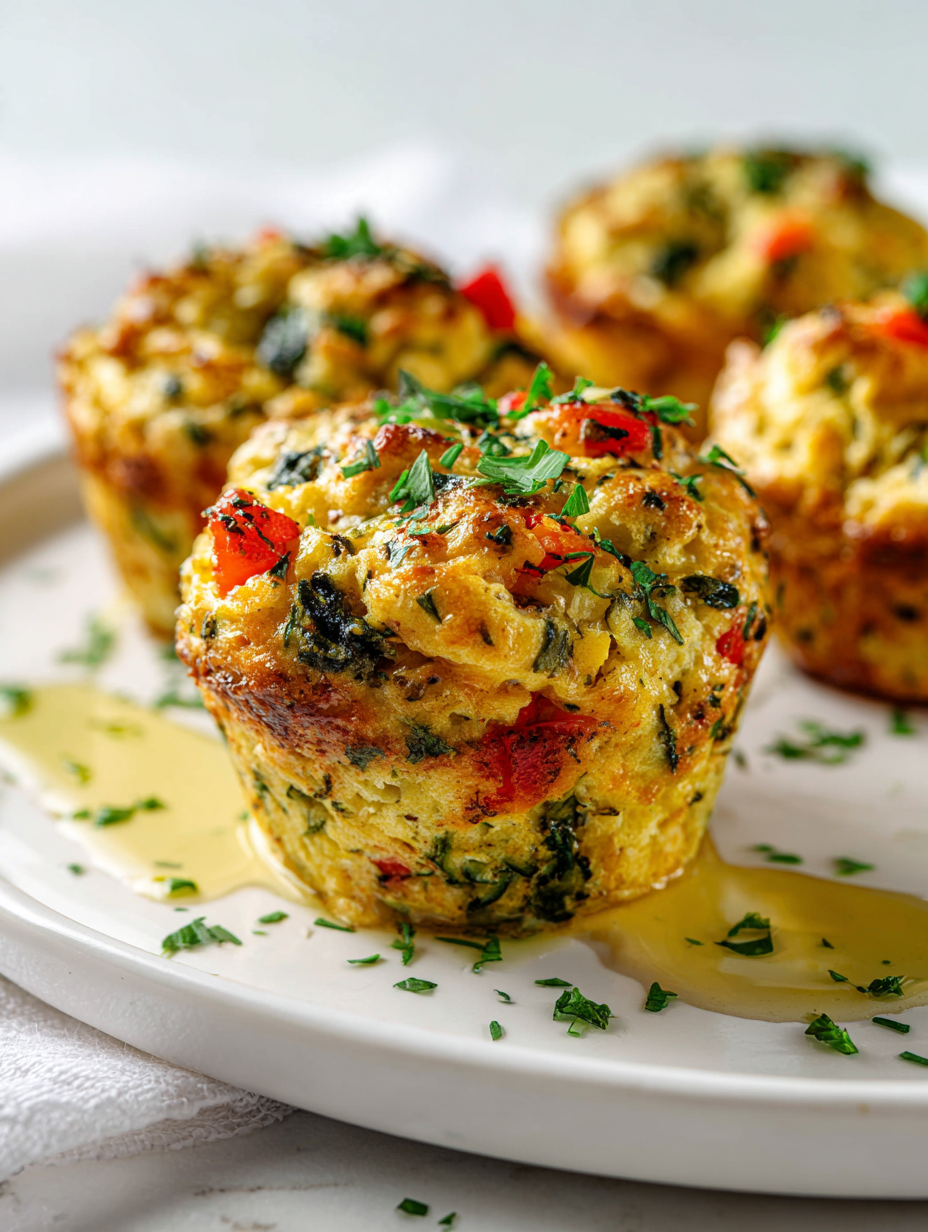
Focusing on how these muffins can be a perfect way to clear out leftover vegetables in the fridge, turning what seems like odds and ends into a satisfying, savory snack or breakfast option.
Turning Odds and Ends into Breakfast
- I love how these muffins make me feel resourceful, turning leftovers into something special.
- There’s a nostalgic joy in the simple act of chopping fresh vegetables, their colors brightening the kitchen.
- Baking these fills my home with a warm, cheesy aroma that wraps around you like a cozy blanket.
- They’ve become my unsung heroes during busy mornings—quick, satisfying, and endlessly adaptable.
Personal Inspiration
- This recipe was born out of a lazy Sunday afternoon, when I peeked into the fridge and saw a handful of odds and ends just waiting to be used. I didn’t want to waste them, but I also didn’t want to fuss over complicated recipes. So I threw everything together into a batter, crossed my fingers, and baked. The result was a batch of muffins that were crispy on the edges, juicy with vegetables, and surprisingly satisfying—like a little breakfast victory.
- Cooking these has become my way of making peace with leftovers, turning what seems like odds and ends into something worth eating. It’s a reminder that a little improvisation can lead to real comfort, without much fuss or fancy ingredients. Plus, the smell of baking veggies and cheese filling the kitchen is a small, daily joy.
- heading: ‘The story behind this recipe’
Contextual origin, trivia, or history
- These muffins have roots in home preservation traditions, turning surplus vegetables into nourishing snacks.
- They trace back to rural farm kitchens where every bit of produce was used, inspiring modern leftover makeovers.
- In some cultures, savory muffins are a breakfast staple, blending the convenience of quick bread with hearty ingredients.
- The concept of vegetable muffins gained popularity with the rise of farm-to-table cooking, emphasizing sustainability.
- Historically, similar baked vegetable dishes appeared in European peasant cuisines, repurposing humble ingredients.
Ingredient breakdown: key components
- Carrots: I love the natural sweetness and crunch they add, but you can swap in parsnips for a milder flavor or zucchini for extra moisture—just watch for excess water.
- Cheddar cheese: It melts beautifully and gives a savory punch, but a sharp Gruyère or feta can bring a different, tangy twist. Use what you like or have on hand.
- Eggs: They bind everything together and give structure, but for a lighter muffin, try mashed avocado or silken tofu—think creamy without the binders.
- Flour: I prefer all-purpose for a sturdy crumb, but whole wheat or spelt flour add nuttiness. For gluten-free, rice or almond flour works, though texture shifts.
- Baking powder: It’s my leavening magic, making muffins rise and fluffy. If you’re out, a pinch of baking soda plus a splash of vinegar can do the trick.
- Olive oil: It lends a rich, fruity note and keeps the muffins moist. You could swap in melted butter or even a neutral oil like sunflower, depending on your mood.
- Herbs & spices: I add thyme or paprika for a little zing, but dried oregano, basil, or even a pinch of chili flakes can tailor the flavor to your taste.
Spotlight on key ingredients
Carrots & Cheese:
- Carrots: I love the natural sweetness and crunch they add, but you can swap in parsnips for a milder flavor or zucchini for extra moisture—just watch for excess water.
- Cheddar cheese: It melts beautifully and gives a savory punch, but a sharp Gruyère or feta can bring a different, tangy twist. Use what you like or have on hand.
Notes for ingredient swaps
- Dairy-Free: Use shredded coconut or a plant-based cheese alternative. Expect a slightly different texture and flavor, but still satisfying.
- Gluten-Free: Swap all-purpose flour for almond or rice flour. The batter may be a tad denser, but still flavorful.
- Egg-Free: Replace eggs with mashed banana or applesauce. Muffins will be softer and a bit more delicate.
- Cheese Variations: Try feta for tang, Gruyère for nuttiness, or nutritional yeast for a cheesy flavor without dairy.
- Vegetable Swaps: Use chopped kale, roasted sweet potato, or mushrooms. Each adds its unique richness and umami.
- Oil Choices: Substitute olive oil with melted butter, avocado oil, or even a light sesame oil for different flavor notes.
- Herb Tweaks: Fresh basil, dill, or parsley can brighten the muffins, while dried herbs offer a more concentrated flavor.
Equipment & Tools
- Muffin tin: To hold the batter during baking
- Mixing bowls: To combine ingredients
- Whisk or fork: To beat eggs and mix wet ingredients
- Knife and chopping board: To chop vegetables
- Measuring cups and spoons: To measure ingredients accurately
- Oven: To bake the muffins
Step-by-step guide to vegetable muffins
- Preheat your oven to 180°C (350°F). Grease a muffin tin or line with paper liners. Gather all your ingredients and equipment.
- Chop leftover vegetables into small, even pieces—aim for about ¼-inch. Mix them in a bowl, set aside.
- In a large mixing bowl, whisk together 2 eggs (beaten), ½ cup olive oil, and ½ cup milk. Add 1 cup all-purpose flour, 1 teaspoon baking powder, and a pinch of salt. Mix until just combined.
- Fold in about 1 cup of shredded cheese, chopped vegetables, and your favorite herbs. Don’t overmix; a few lumps are fine.
- Divide batter evenly among muffin cups, filling each about ¾ full. Tap the tin gently on the counter to settle the batter.
- Bake for 20-25 minutes. The muffins are done when they turn golden around the edges and a toothpick inserted in the center comes out clean.
- Check for doneness: muffins should be golden, a little crispy on top, and firm to the touch. The smell should be warm, cheesy, and roasted vegetables.
- Remove from oven and let cool in the tin for 5 minutes. Then transfer to a wire rack to cool completely or serve warm.
- Finish with a sprinkle of herbs or extra cheese if desired. Serve with a dollop of yogurt or a simple salad.
Let the muffins rest in the tin for 5 minutes, then transfer to a wire rack. Serve warm or at room temperature, garnished with herbs or cheese if desired.
How to Know It’s Done
- Muffins are golden and slightly crispy on edges.
- A toothpick inserted in the center comes out clean.
- Muffins feel firm but spring back when gently pressed.
Savory Vegetable Muffins
Ingredients
Equipment
Method
- Preheat your oven to 180°C (350°F). Grease the muffin tin or line with paper liners, ready for the batter.
- Chop your leftover vegetables into small, even pieces—about ¼ inch—so they bake evenly and look colorful.
- In a large bowl, whisk together the beaten eggs, olive oil, and milk until the mixture is smooth and slightly frothy.
- Add the flour, baking powder, and salt to the wet ingredients, then stir gently until just combined—don't overmix to keep the muffins light.
- Fold in the shredded cheese, chopped vegetables, and chopped herbs with a spatula, ensuring everything is evenly distributed but avoiding overworking the batter.
- Divide the batter evenly among the muffin cups, filling each about ¾ full. Gently tap the tin on the counter to settle the batter and remove air bubbles.
- Bake in the preheated oven for 20-25 minutes, until the muffins are golden brown around the edges and a toothpick inserted in the center comes out clean.
- Carefully remove the muffins from the oven and let them cool in the tin for about 5 minutes. The aroma should be warm, cheesy, and roasted.
- Transfer the muffins to a wire rack and let them cool slightly or serve warm—these are delicious when still a little crispy on top.
- Enjoy these savory muffins plain or with a dollop of yogurt, accompanied by a fresh salad or your favorite breakfast sides.
Notes
Pro tips for perfect muffins
- Bolded mini-head: Use room temperature ingredients to ensure even mixing and better rise.
- Bolded mini-head: Gently fold in vegetables to keep the batter airy and prevent it from deflating.
- Bolded mini-head: For a crisp top, bake at the higher end of the temperature range and avoid opening the oven early.
- Bolded mini-head: Use a toothpick inserted in the center to check for doneness—clean comes out with no batter.
- Bolded mini-head: If muffins brown too quickly, loosely tent with foil to prevent burning while cooking through.
- Bolded mini-head: Rest muffins in the tin for at least 5 minutes—this helps set the structure before transferring.
- Bolded mini-head: For extra flavor, sprinkle herbs or cheese on top just before baking for a golden crust.
Common mistakes and how to fix them
- TOO MUCH WATER: Overly watery muffins—reduce vegetable moisture or squeeze out excess liquid.
- UNDERBAKED: Muffins feel dense and wet—bake 3-5 minutes longer and check for golden edges.
- OVERSPOILED: Burnt tops or dark edges—cover with foil halfway through baking to prevent over-torching.
- MISSED TEMP: Muffins don’t rise—ensure oven hits 180°C (350°F) and use fresh leavening agents.
Quick fixes and pantry swaps
- When muffins crackle and shimmer, they’re perfectly baked—rescue with a quick 5-minute bake if underdone.
- Dumped too much water? Squeeze excess liquid from vegetables before mixing to prevent sogginess.
- If muffins stick or break apart, spray tins well or use liners for easy removal.
- When tops scorch quickly, shield with foil mid-bake to keep moisture and prevent over-torching.
- Splash a little lemon juice or vinegar into the batter if vegetables release too much water, brightening flavor.
Prep, store, and reheat tips
- Prepare the chopped vegetables and grate the cheese a day ahead to save time and keep ingredients fresh in the fridge.
- Store baked muffins in an airtight container at room temperature for up to 2 days, maintaining their crispy edges and moist crumb.
- For longer storage, freeze muffins in a sealed bag for up to 3 months; reheat directly from frozen for a quick snack.
- Reheat muffins in a 180°C (350°F) oven for about 10 minutes until warmed through and fragrant, checking for crispy top and soft interior.
Top questions about savory vegetable muffins
1. Can I use frozen vegetables?
Yes, you can use frozen vegetables—just thaw and drain excess water first to avoid sogginess.
2. Can I customize the vegetables?
Absolutely, swap in zucchini or mushrooms for different textures and flavors—just chop small and adjust cooking time.
3. Are dairy-free options possible?
Yes, for a dairy-free version, use plant-based cheese and skip the milk, replacing it with almond or soy milk.
4. Can I make the batter in advance?
You can prepare the batter a few hours ahead, cover tightly, and keep it in the fridge to bake fresh later.
5. How do I know when they’re done?
Bake until muffins are golden brown on top, smell warm and cheesy, and a toothpick comes out clean in the center.
6. How should I store leftover muffins?
Store leftovers in an airtight container at room temperature for 1-2 days or freeze for up to 3 months.
7. How do I reheat them?
Reheat in a 180°C (350°F) oven for about 10 minutes until warm and crispy on top, with a soft interior.
8. What if my muffins are dense?
If muffins turn out dense, check your leavening agents—they might be old or not mixed well, causing poor rise.
9. How can I enhance flavor if needed?
Splash a teaspoon of lemon juice into the batter to brighten flavors if vegetables seem bland or watery.
10. Any tips to prevent sticking?
Use a silicone muffin mold or line your tin to prevent sticking and make removal easier, especially with sticky veggies.
These muffins are a little reminder that turning leftovers into something special doesn’t need fancy equipment or rare ingredients. It’s about trusting your nose, tasting as you go, and embracing the imperfect charm of home baking. Each batch tells a story—an accidental mix, a tweak, that satisfying moment when they come out golden and fragrant.
In a world of fleeting trends, these humble muffins bring a sense of grounded comfort. They’re perfect for mornings when you need something quick and nourishing, or when you’re just trying to clear out the fridge with a bit of kitchen improvisation. Either way, they’ll stick around as a simple, honest thing—made by hand, enjoyed by the spoonful.

Hi, I’m Oliver Stone, the writer, cook, and storyteller behind Crying Into the Onions. I’m so glad you found your way here. This blog was born from equal parts humor, heart, and a deep love for honest cooking. I started this blog to share more than just recipes — I wanted to capture the emotions, memories, and quirks that make food more than fuel. Because sometimes, cooking makes you laugh. Sometimes, it makes you cry (into the onions, naturally). And most of all, it brings people together.

