Cheese muffins might seem like just a quick snack, but to me, they’re a canvas for personal flair. I love tossing in unexpected ingredients—smoked paprika for a smoky kick or caramelized onions for sweetness—that turn a humble muffin into a tiny, portable flavor explosion. It’s comforting, versatile, and a little bit rebellious in the best way.
These muffins remind me of lazy mornings and spontaneous baking sessions in my small kitchen. They’re forgiving, forgiving enough that you can experiment with what’s in the fridge without worrying too much. Each batch feels like a little experiment, a warm, cheesy embrace that’s perfect for sharing or savoring solo.
Focusing on how cheese muffins can be a nostalgic comfort food that you can customize with unexpected ingredients like smoked paprika or caramelized onions, turning a simple snack into a personal culinary statement.
Nostalgic comfort in every bite
- Making cheese muffins always feels like a small act of rebellion, bending simple ingredients into something unexpectedly delightful.
- The smell of baking cheese muffins brings back lazy weekend mornings with my family, a cozy, cheesy warmth filling the house.
- Every time I tweak the recipe with a pinch of smoked paprika or a handful of herbs, I feel like I’m creating a tiny, edible masterpiece.
- There’s a quiet pride in pulling golden, slightly crisp muffins from the oven, knowing I’ve turned basic pantry staples into comfort food.
- These muffins remind me that sometimes, the simplest snacks can carry the most personal stories and little moments of joy.
The story behind this recipe
- Making cheese muffins has always been my way of holding onto childhood memories. I remember sneaking bites warm from the oven, the cheese gooey and fragrant, a small rebellion against adult rules. Over the years, I’ve tweaked the recipe, adding bits of leftover cheese and experimenting with herbs, trying to capture that same cozy feeling but with my own twist.
- This recipe is born from those lazy weekend mornings and late-night fridge raids. It’s honest, forgiving, and adaptable—perfect for using whatever cheese or bits of veg you’ve got lying around. Baking these feels like a quiet act of self-care, a simple pleasure that turns humble ingredients into something worth savoring.
- heading
- story_type
Cheese Muffins Trivia & Origins
- Cheese muffins likely originated as a home-baked comfort food in rural communities, where simple ingredients were turned into satisfying snacks.
- Historically, muffins like these have roots in British and American baking traditions, where cheese was added to bread-like treats for extra flavor and richness.
- In some regions, cheese muffins evolved from savory quick breads, becoming a popular portable snack for farmers and workers.
- The use of cheese in muffins became especially popular in the mid-20th century, coinciding with the rise of convenience baking and home cooking experimentation.
Key ingredients and tips
- Cheddar cheese: I love the sharp, tangy punch it adds—opt for a good block and grate fresh; it melts beautifully and gives that oozy, smoky finish.
- All-purpose flour: It’s the reliable base that keeps everything tender and holds the muffins together—don’t skip or substitute with too much whole wheat unless you want a denser crumb.
- Baking powder: I always double-check freshness here; this is what makes the muffins rise and turn golden—if it’s old, the muffins stay flat and sad-looking.
- Milk: I prefer whole milk for richness, but a splash of buttermilk gives a lovely tang and tender crumb—adjust slightly if using a different milk type.
- Eggs: They bind everything and give structure—if you’re out, a flaxseed or chia seed ‘egg’ can work, but the texture might change a bit.
- Butter: I use unsalted, melted until just warm—adds a subtle richness and helps develop a crisp top; don’t overheat or it’ll seize up.
- Optional add-ins: Bits of cooked bacon, herbs, or caramelized onions can turn these muffins from plain to personality-packed—use what you love or have on hand.
Spotlight on key ingredients
Cheddar cheese:
- I love the sharp, tangy punch it adds—opt for a good block and grate fresh; it melts beautifully and gives that oozy, smoky finish.
- All-purpose flour: It’s the reliable base that keeps everything tender and holds the muffins together—don’t skip or substitute with too much whole wheat unless you want a denser crumb.
Baking powder:
- I always double-check freshness here; this is what makes the muffins rise and turn golden—if it’s old, the muffins stay flat and sad-looking.
- Milk: I prefer whole milk for richness, but a splash of buttermilk gives a lovely tang and tender crumb—adjust slightly if using a different milk type.
Ingredient swap tips
- Dairy-Free: Swap regular cheese for dairy-free shreds or nutritional yeast. The flavor will be milder, but still satisfying.
- Gluten-Free: Use a 1:1 gluten-free baking flour blend. Expect a slightly denser crumb and a different mouthfeel.
- Vegan: Replace eggs with flaxseed or chia seed gel, and choose plant-based butter or oil. The texture may be a bit softer.
- Cheese Types: Swap cheddar for Gruyère or Monterey Jack. Different melting qualities and flavor profiles, but equally tasty.
- Milk Options: Use almond or soy milk if dairy-free. Slightly different richness; adjust with a splash of extra oil or butter substitute.
- Add-ins: Incorporate cooked bacon, herbs, or caramelized onions. Feel free to experiment based on what’s in your fridge.
- Sweet Twist: Add a touch of honey or a sprinkle of cinnamon for a sweet-savory combo, if you’re feeling playful.
Equipment & Tools
- Muffin tin: Holds the batter and shapes the muffins.
- Mixing bowls: Combine ingredients separately for dry and wet components.
- Grater: Shred cheese for even melting and maximum flavor.
- Whisk: Mix wet ingredients thoroughly.
- Spatula: Gently fold ingredients without overmixing.
- Oven: Bake the muffins at a steady 190°C (375°F).
- Cooling rack: Allow muffins to cool evenly and develop a crisp top.
Step-by-step guide to Cheese Muffins
- Preheat your oven to 190°C (375°F). Grease a muffin tin or line with paper liners. Have all ingredients at room temperature for easy mixing.
- In a large mixing bowl, whisk together 1 1/2 cups all-purpose flour, 1 tablespoon baking powder, and a pinch of salt. Set aside.
- Grate about 1 cup of sharp cheddar cheese. I like to use a block for maximum flavor—freshly grated melts better and has a vibrant flavor.
- In a separate bowl, whisk 2 large eggs until just combined. Add 1/2 cup milk (whole or buttermilk) and 1/4 cup melted unsalted butter. Mix until smooth.
- Pour the wet ingredients into the dry ingredients. Gently fold together with a spatula—don’t overmix; a few lumps are fine. Overmixing makes tough muffins.
- Fold in the grated cheese and any extras like chopped herbs, cooked bacon, or caramelized onions. Keep the mix chunky for bursts of flavor in each bite.
- Spoon the batter into the prepared muffin tin, filling each cup about 2/3 full. Don’t overfill; the muffins will rise but not overflow.
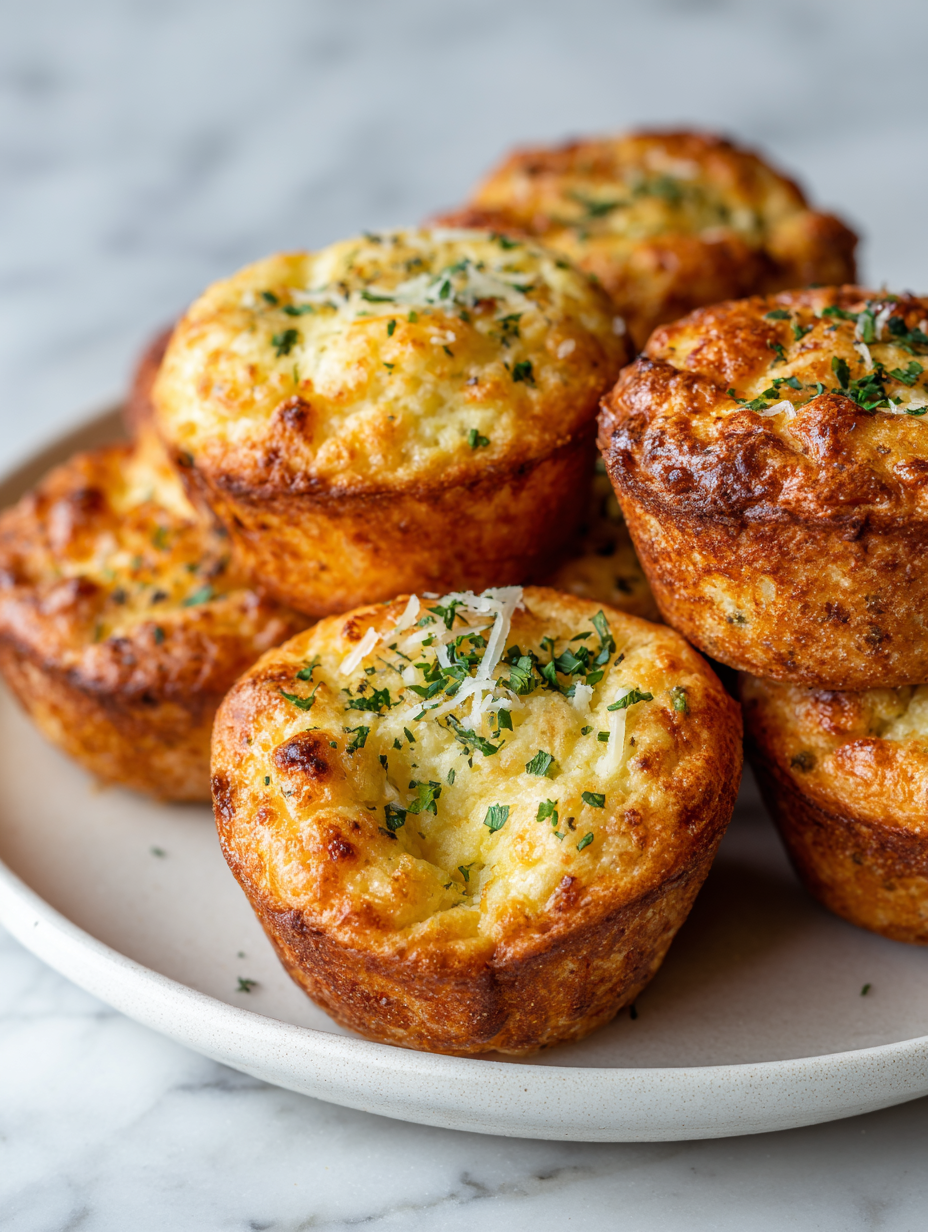
- Bake for 20–25 minutes. The tops should be golden-brown, and the muffins should feel firm when gently pressed. The cheese on top should be slightly crispy.
- Remove from oven and let cool in the tin for 5 minutes. Transfer to a wire rack and cool slightly before serving. Muffins are best warm but still good at room temperature.
- For the best texture, let the muffins rest for at least 10 minutes before slicing or serving. This allows the crumb to set and makes them easier to handle.
Let the muffins rest in the tin for 5 minutes, then transfer to a wire rack. Serve warm or at room temperature, optionally with a pat of butter or a sprinkle of extra cheese.
How to Know It’s Done
- Golden-brown tops with slightly crispy edges.
- A toothpick inserted in the center comes out clean or with moist crumbs.
- Muffins feel firm but spring back slightly when pressed.
Cheese Muffins with a Personal Twist
Ingredients
Equipment
Method
- Preheat your oven to 190°C (375°F). Lightly grease the muffin tin or line with paper liners, and have all ingredients ready at room temperature.
- In a large mixing bowl, sift together the flour and baking powder to ensure an airy rise, then set aside.
- Grate the sharp cheddar cheese using a box grater until you have about 1 cup of cheese, then set aside.
- In a separate bowl, whisk the eggs until just combined, then stir in the milk and melted butter until the mixture is smooth and slightly frothy.
- Pour the wet mixture into the dry ingredients, gently folding with a spatula until just combined. Avoid overmixing to keep the muffins tender.
- Gently fold in the grated cheese and any optional add-ins like herbs, cooked bacon, or smoked paprika, distributing evenly throughout the batter.
- Spoon the batter into the prepared muffin cups, filling each about two-thirds full, which allows room for rising and creates a nice domed top.
- Bake in the preheated oven for 20–25 minutes, or until the tops are golden-brown and a toothpick inserted into the center comes out clean.
- Remove the muffins from the oven and let them cool in the tin for 5 minutes, then transfer to a cooling rack to cool slightly and develop a crisp top.
- Serve the muffins warm, perhaps with a pat of butter or additional cheese, and enjoy their melty, cheesy goodness.
Pro tips for perfect cheese muffins
- & flaky: Use cold butter and quickly cut it into the flour for a tender, flaky texture.
- Moist & cheesy: Gently fold in cheese without overmixing to keep muffins light and oozy.
- Golden perfection: Brush tops with melted butter before baking for a shiny, crispy crust.
- Even rise: Fill muffin cups about 2/3 full to prevent overflow and ensure a domed top.
- Flavor punch: Add a pinch of smoked paprika or herbs to the batter for extra depth and aroma.
- Cheese distribution: Distribute cheese evenly by folding gently—avoid sinking all to the bottom.
- Avoid overbaking: Check for a golden top and a toothpick coming out with moist crumbs around 20 minutes.
Common mistakes and how to fix them
- FORGOT to check oven temperature → Always verify oven calibration before baking.
- DUMPED the cheese batter too quickly → Fold gently to keep muffins light and airy.
- OVER-TORCHED the tops → Cover with foil halfway if browning too fast.
- SKIPPED resting time → Let muffins sit for 5 minutes to set crumb properly.
Quick fixes and pantry swaps
- When batter is too thick, splash in a bit more milk to loosen it up.
- If muffins are flat, double-check your baking powder’s freshness before baking.
- Splash melted butter on tops before baking to enhance crispness and shine.
- Patch cracked muffins with a dab of batter, then bake for a minute longer.
- Shield over-browned tops with foil if they crackle and darken too quickly.
Prep, store, and reheat tips
- Prep the muffin batter up to a day in advance; keep covered in the fridge to meld flavors and save time.
- Store baked muffins in an airtight container at room temperature for up to 2 days; for longer, freeze individually and reheat later.
- Freezing extends shelf life to about 1 month; wrap muffins tightly in plastic wrap and then foil for best results.
- Reheat muffins in a 180°C (350°F) oven for 8-10 minutes, or until warmed through; the smell of cheesy goodness will perk up as they heat.
- For a softer reheated muffin, wrap in a damp paper towel before microwaving—expect a slight change in texture but still tasty.
Top questions about Cheese Muffins
1. What is the ideal serving temperature for cheese muffins?
Cheese muffins are best served warm, with the cheese still oozy and melty. They have a tender crumb and a crispy top, making each bite satisfying and flavorful.
2. Can I use pre-shredded cheese for this recipe?
Use freshly grated sharp cheddar for the best flavor and melt. The cheese should be pungent and slightly oily when grated.
3. Can I swap the cheese in this recipe?
Yes, you can substitute with other cheeses like Gruyère, Monterey Jack, or pepper Jack for different flavor profiles and melting qualities.
4. How should I store leftover cheese muffins?
Storing in an airtight container at room temperature keeps them fresh for 1-2 days. For longer storage, freeze individually and reheat in the oven.
5. What add-ins can I include in cheese muffins?
You can add cooked bacon, herbs, caramelized onions, or even a dash of smoked paprika to customize the flavor and add complexity.
6. How do I prevent the muffins from becoming dense?
Use a light hand when mixing to avoid tough muffins. Gently fold in cheese and other ingredients to keep the crumb tender and airy.
7. How do I know when the muffins are done?
Bake until the tops are golden and a toothpick inserted in the center comes out with moist crumbs. The edges should be crisp, and the muffins should feel firm but springy.
8. Can I substitute the milk in this recipe?
You can replace milk with buttermilk or plant-based milks like almond or soy for different flavor and dietary needs. The texture may vary slightly.
9. What’s a common mistake when making these muffins?
Avoid overmixing the batter, as this can make the muffins tough. Mix just until the ingredients are combined, with a few lumps remaining.
10. How can I enhance the crust of the muffins?
Brush the tops with melted butter before baking for a shiny, crispy crust, and consider adding a sprinkle of extra cheese on top for presentation.
These cheese muffins aren’t just a snack, they’re a little reminder of how simple ingredients can turn into something warm and satisfying. They feel like a small, homemade act of comfort that’s perfect for any season or mood. Once you get the hang of mixing and baking, they’ll become a go-to for whenever you need a quick, cheesy boost.
Whether served with soup, as a snack, or just on their own, these muffins hold a bit of nostalgia and a lot of flavor. They’re honest, a little messy, and totally worth the effort—just like good home cooking should be.

Hi, I’m Oliver Stone, the writer, cook, and storyteller behind Crying Into the Onions. I’m so glad you found your way here. This blog was born from equal parts humor, heart, and a deep love for honest cooking. I started this blog to share more than just recipes — I wanted to capture the emotions, memories, and quirks that make food more than fuel. Because sometimes, cooking makes you laugh. Sometimes, it makes you cry (into the onions, naturally). And most of all, it brings people together.

